How to Improve Your Google Ranking With Rank Math
Anúncios
In this article, let us show you how to improve your Google ranking with Rank Math SEO.
Firstly, Rank Math SEO is our preferred SEO plugin. We don’t want to brag since we had already explained our reasons for using the Pro version in one of our posts.
Anúncios
It has been four months since we first installed Rank Math SEO Pro on our website. All we can say is we could never go back. It has been a delightful experience to use Rank Math to improve our website traffic and ranking on SERP. Take a look at our Google Search Console Result below.
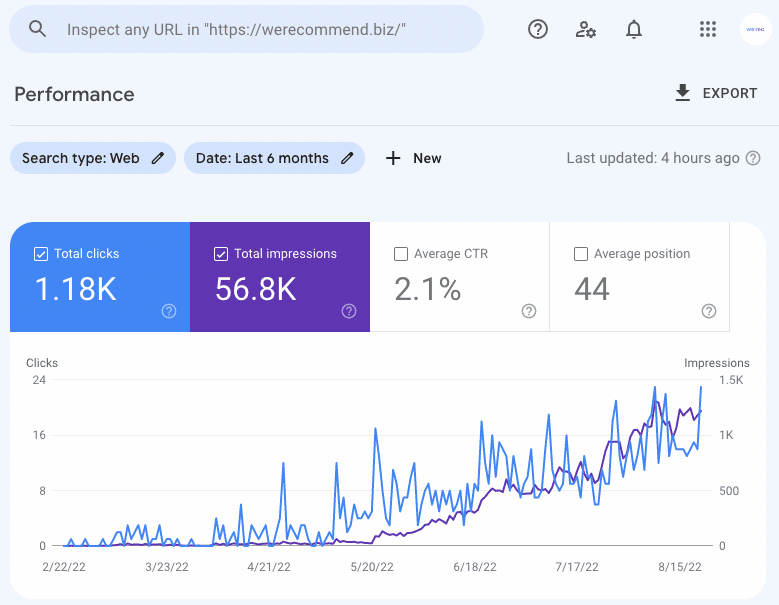
It’s not much, but it grows consistently. We’ve heard that any trajectory going upwards is always a good thing. So, we thought we could share a few tips with you.
Anúncios
How to Improve Your Google Ranking With Rank Math SEO
We’ll start with a summary for those who don’t like to read long-form content. First and foremost, getting Rank Math Pro is essential to improving your Google ranking. We will share how we set up our Rank Math SEO plugin. Secondly, you will get access to the Analytics menu. Thirdly, you get the most advanced Schema Generator with the Pro version. Fourthly, with the help of the Instant Indexing plugin, you will rank your content faster.
Step 1: Setting Up Your Rank Math SEO
After installing your Rank Math SEO plugin to your website, you need to set up a few things. Head to the Rank Math menu in your WordPress dashboard and select General Settings. We believe these settings work best for any site in general.
General Settings
Links
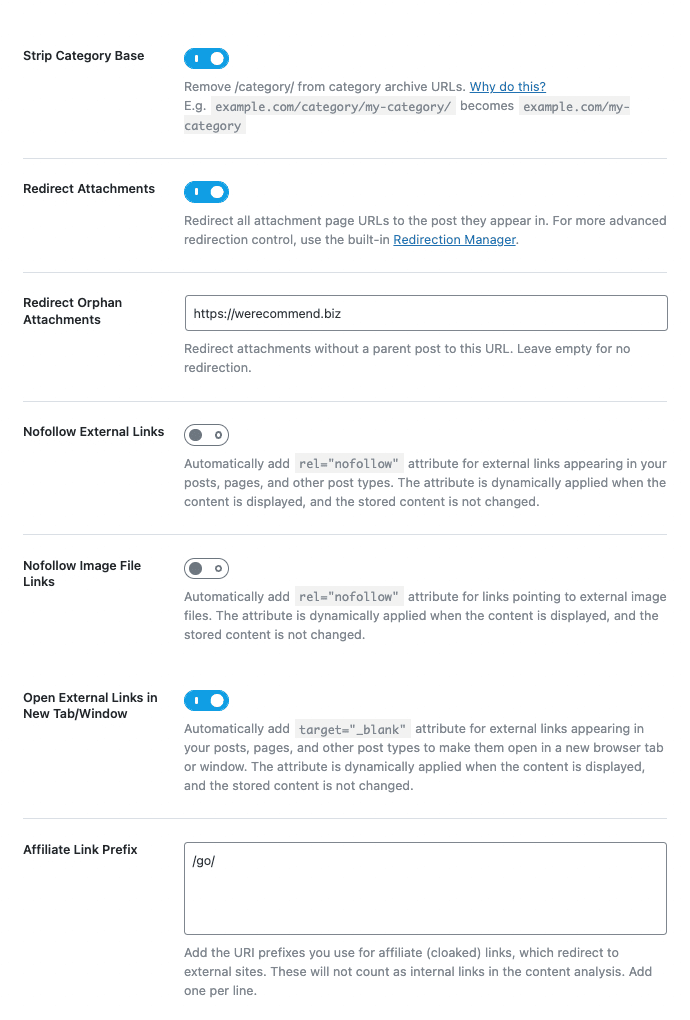
- Strip Category Base: Activate. Turning this on will make your URL looks neat without any post categories.
- Redirect Attachments: Activate.
- Redirect Orphan Attachments: Fill it with your homepage URL.
- Nofollow External Links: Deactivate. We prefer to turn this off for better control when setting our external links.
- Nofollow Image File Links: Deactivate. Similar reason with Nofollow External Links.
- Open External Links in New Tab/Window: Activate. Automatically set any external links to open in a new tab/window.
- Affiliate Link Prefix: Fill it with /go/.
Breadcrumbs
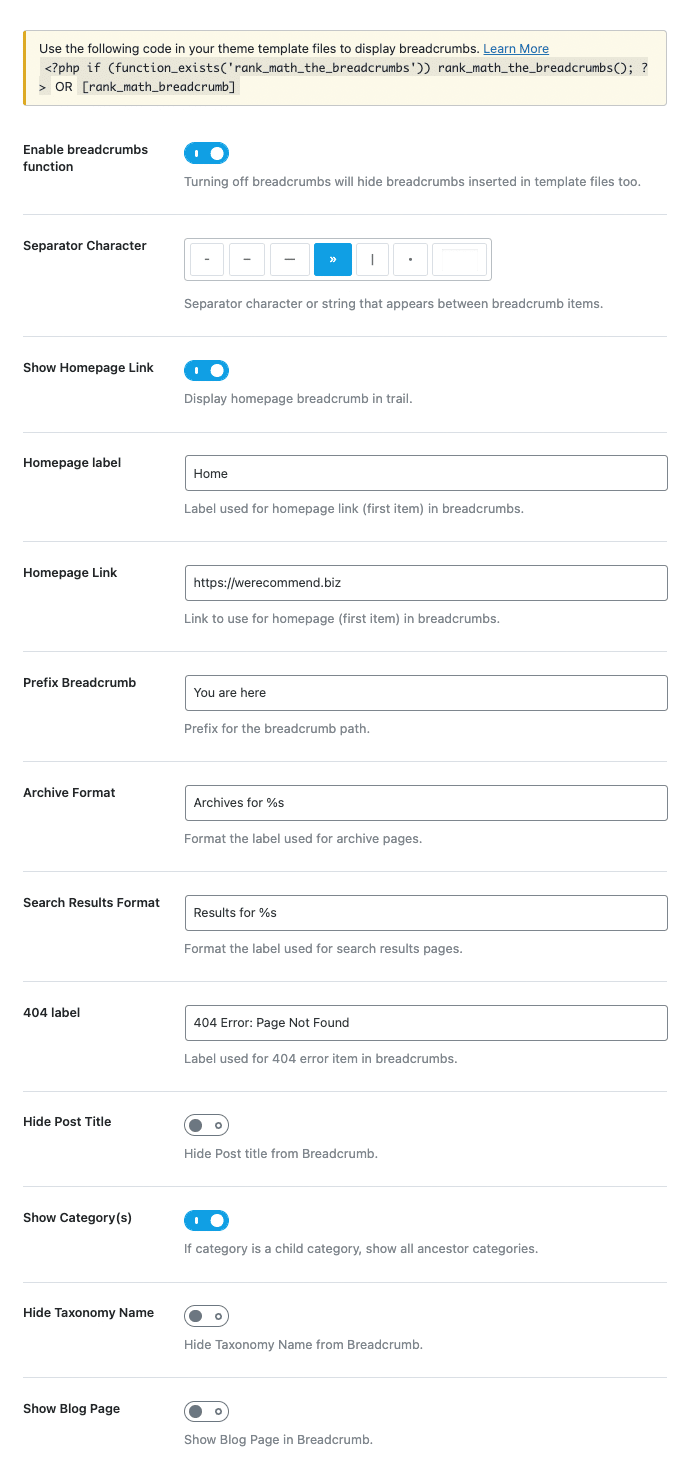
- Enable Breadcrumbs Function: Activate.
- Separator Character: Choose anything you want.
- Show Homepage Link: Activate.
- Homepage Label: Fill it with “Home.”
- Homepage Link: Fill it with your homepage URL.
- Prefix Breadcrumb: Fill it with “You are here.”
- Archive Format: Fill it with “Archives for %s.”
- Search Results Format: Fill it with “Results for %s.”
- 404 Label: Fill it with “404 Error: Page Not Found.”
- Hide Post Title: Deactivate. You don’t want to hide your post title from Breadcrumb.
- Show Category(s): Activate.
- Hide Taxonomy Name: Deactivate.
- Show Blog Page: Deactivate.
Images

- Add Missing ALT Attributes: Activate.
- Alt Attribute Format: Fill it with “%filename%.”
Deactivate these settings:
- Add Missing TITLE Attribute
- Add Missing Image Caption
- Add Missing Image Description
- Add ALT Attributes for Avatars
Select No change for these settings:
- Change Title Casing
- Change ALT Attribute Casing
- Change Description Casing
- Change Caption Casing
Webmaster Tools
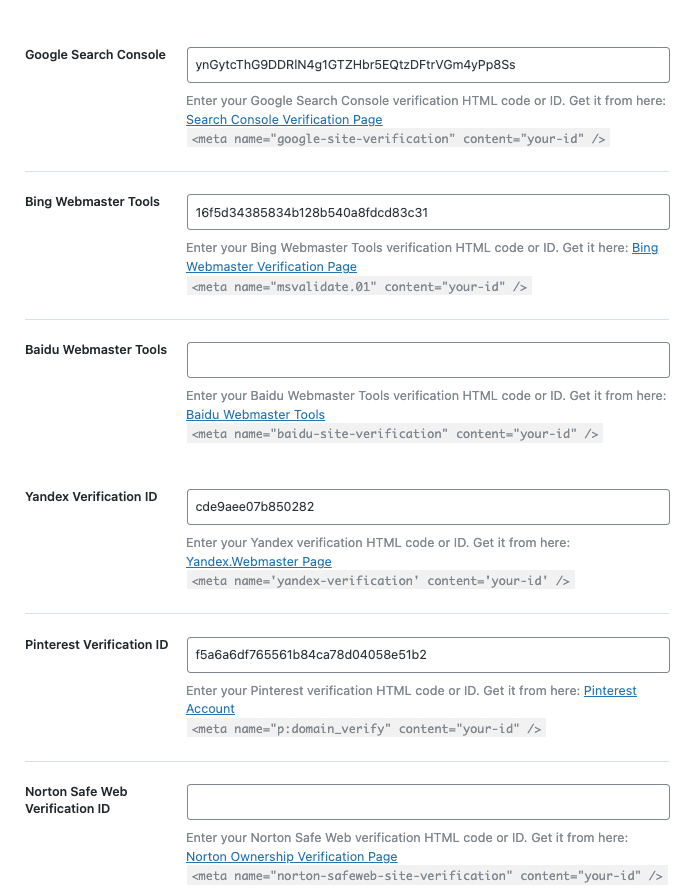
Depending on your choice, you can fill everything up with your custom HTML code or ID for each search engine. However, we choose to fill our Google Search Console, Bing, Yandex, and Pinterest.
Edits robots.txt
We suggest leaving this part empty as WordPress will automatically handle the contents. If you have no idea about robots.txt, don’t do anything.
Others
Turn everything off.
Edit .htcaccess
Same treatment with Edits robots.txt
404 Monitor
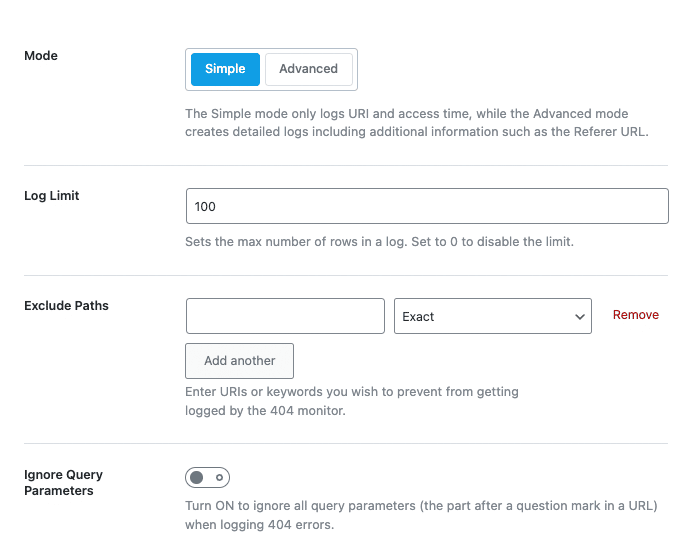
- Mode: Simple.
- Log Limit: Set it to 100
- Exclude Paths: You can leave it as it is.
- Ignore Query Parameter: Deactivate.
Redirections
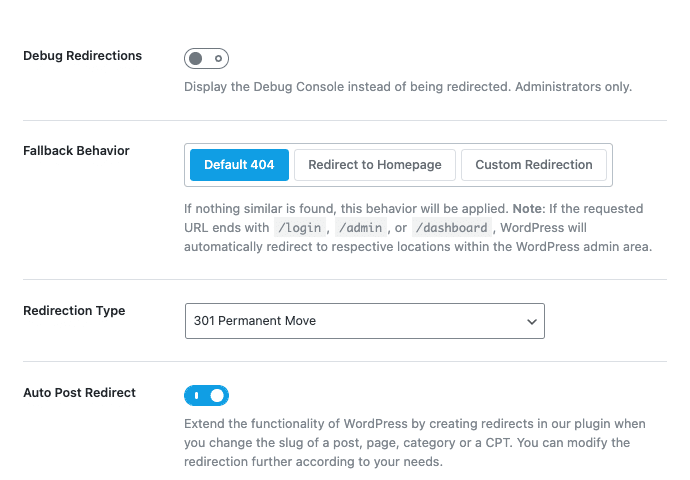
- Debug Redirections: Deactivate.
- Fallback Behavior: Set it to Default 404.
- Redirection Type: Set it to 301 Permanent Move.
- Auto Post Redirect: Activate.
Analytics
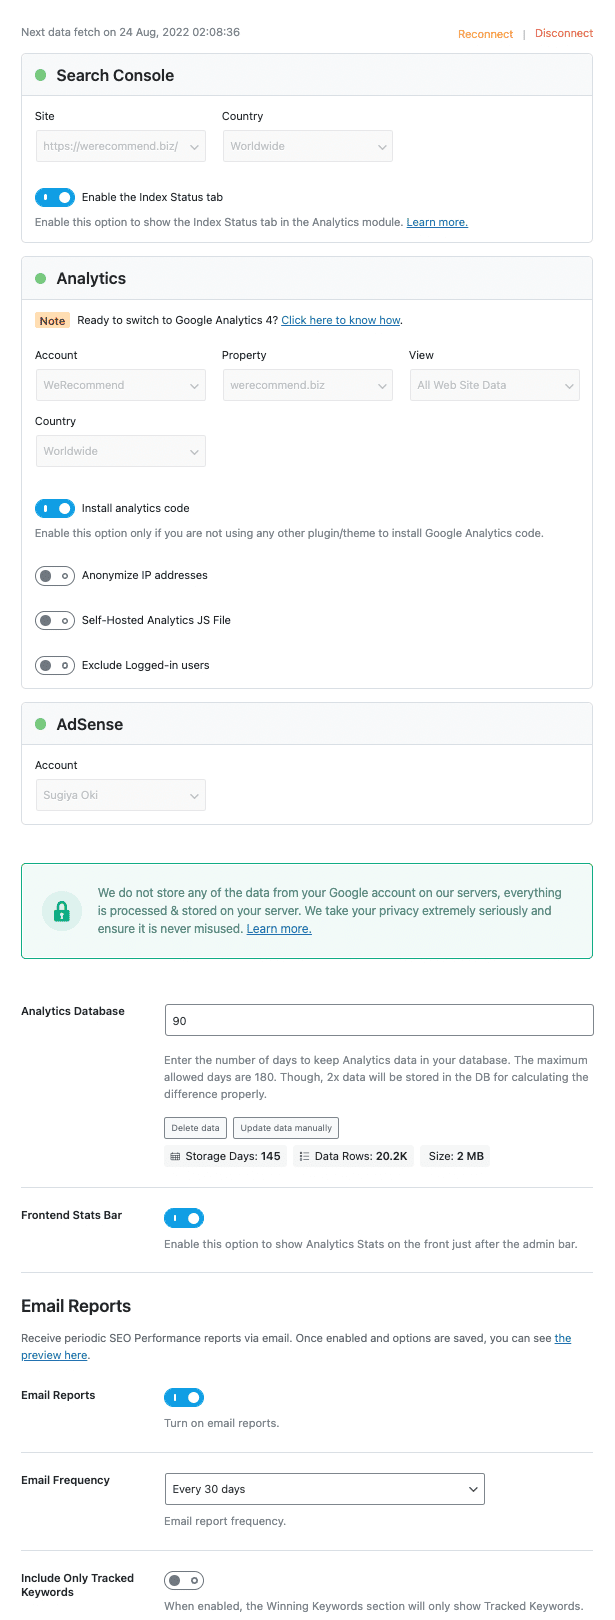
Connect your Google Search Console and Google Analytics using Rank Math. This way, you can access the data right from your WordPress dashboard.
If you haven’t installed Google Analytics code on your website, you can use it with the help of Rank Math SEO. You don’t need any additional plugin such as Google Site Kit to do that for you.
Content AI
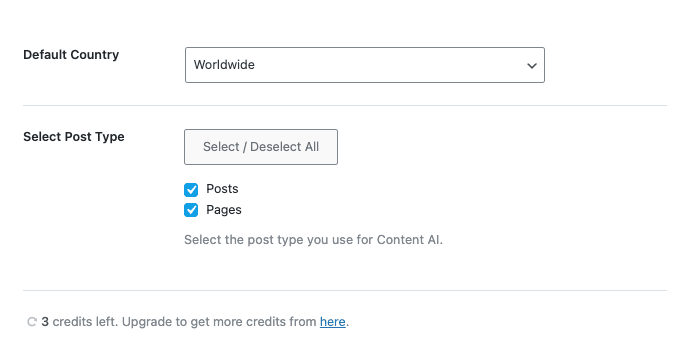
If you intend on using Content AI to help you write, you can set the default country to Worldwide.
Titles & Meta
Global Meta
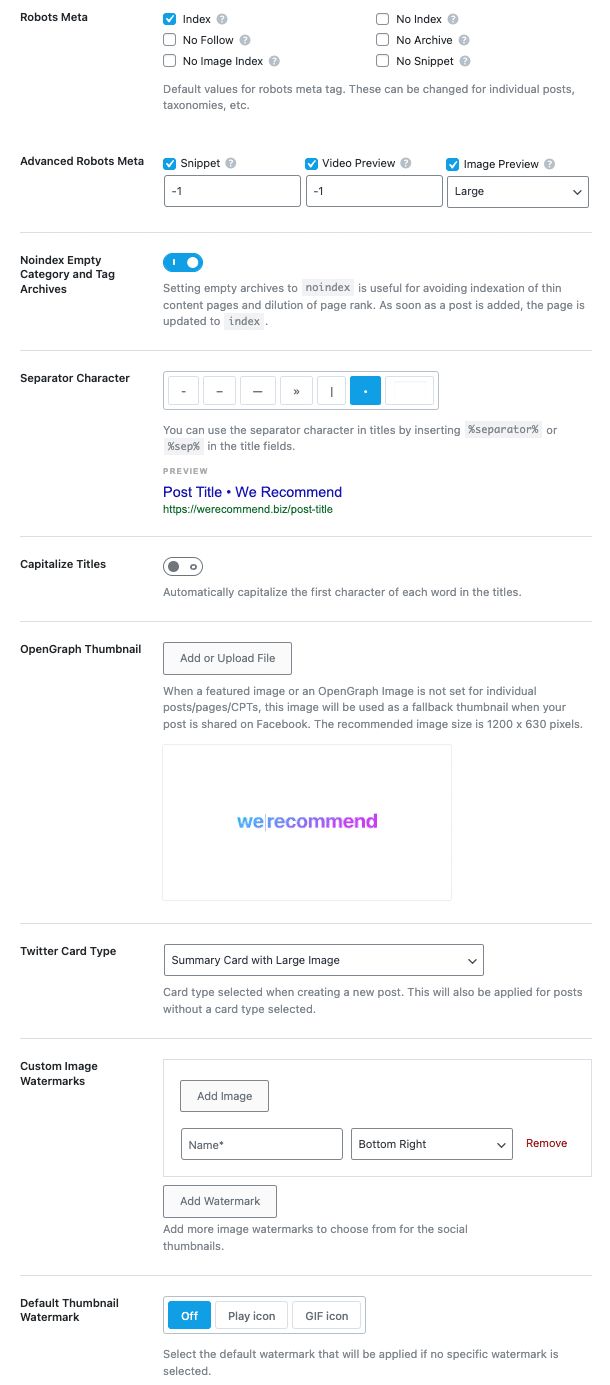
- Robots Meta: Tick the Index option.
- Advanced Robots Meta: Tick everything.
- Noindex Empty Category and Tag Archives: Activate.
- Separator Character: You can choose anything you want.
- Capitalize Titles: Deactivate. We prefer not to. It looks better.
- OpenGraph Thumbnail: You can upload your website logo. The recommended size is 1200 x 630 pixels.
- Twitter Card Type: We prefer to use the Summary Card with Large Image.
- Custom Image Watermarks: Add a watermark to your custom image to avoid copyright issues.
- Default Thumbnail Watermark: We prefer to set this Off.
Local SEO
You can fill up everything with your local SEO information. Make sure to link your About Page and Contact Page accordingly.
Social Meta
You can do similar treatment with the local SEO settings.
Homepage
Depending on your homepage setting, you can set all Title and Meta settings of your website.
Post Formats
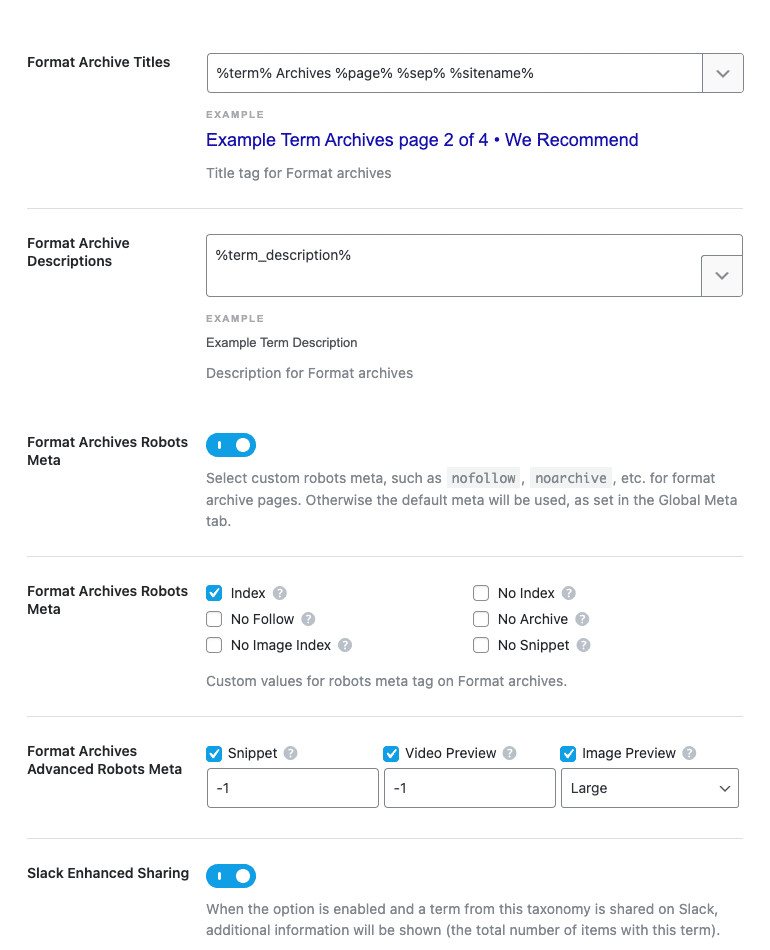
- Format Archive Titles: Fill it with “%term% Archives %page% %sep% %sitename%.”
- Format Archive Description: Fill it with “%term_description%.”
- Format Archives Robots Meta: Activate. Tick the Index option, Snippet, Video Preview, and Image Preview.
- Slack Enhanced Sharing: Activate.
Author Archives

We prefer to disable it since we already use the Monolongui Authorship plugin.
Misc Pages
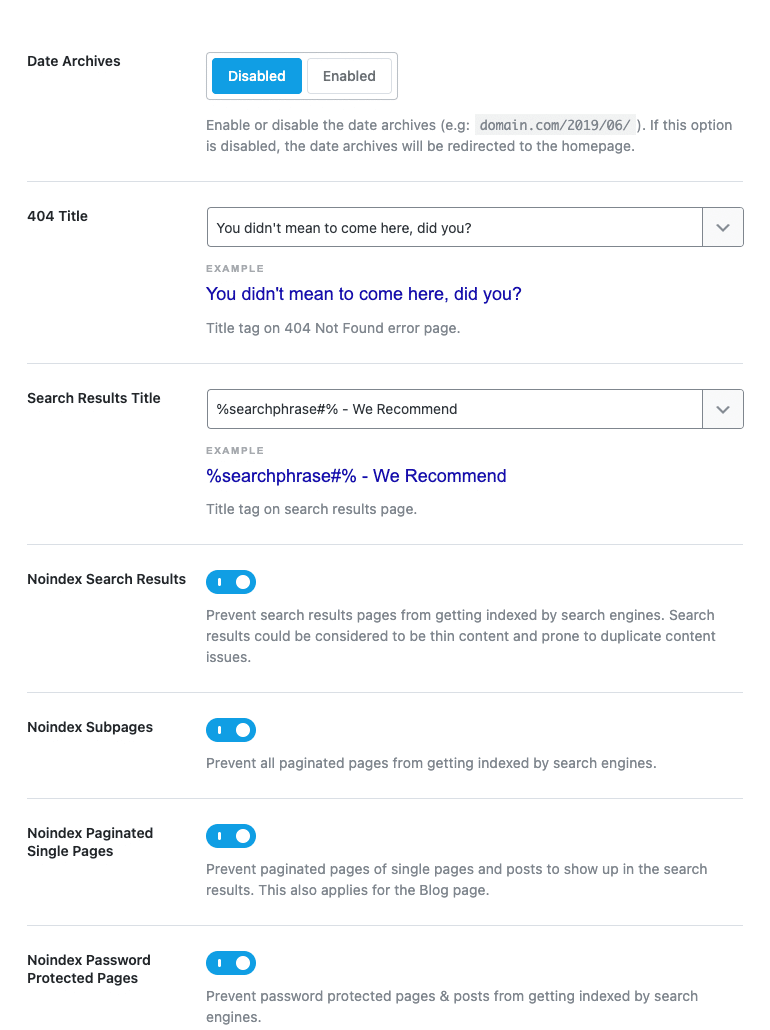
- Date Archives: Disabled. Unless you are a news website.
- 404 Title: You can fill it with anything you want. We prefer to fill it with “You didn’t mean to come here, did you?”
- Search Results Title: Fill it with “%searchphrase#% – Your Website Name.”
Activate these settings:
- Noindex Search Results
- Noindex Subpages
- Noindex Paginated Single Pages
- Noindex Password Protected Pages
Posts
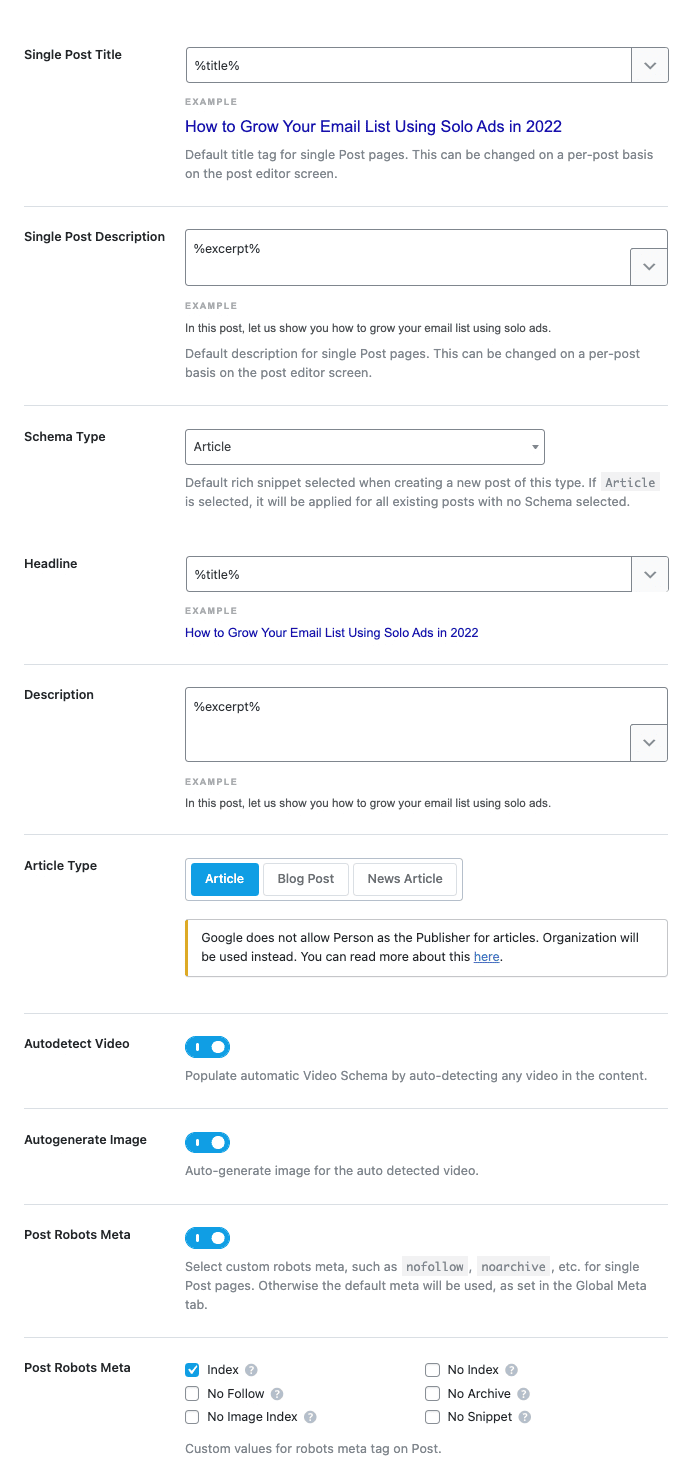

- Single Post Title: Fill it with “%title%.”
- Single Post Description: Fill it with “%excerpt.”
- Schema Type: You can choose the Article or Blog Post option.
- Headline: Fill it with “%title.”
- Description: Fill it with “%excerpt%.”
- Autodetect Video: Activate.
- Autogenerate Image Activate.
- Post Robots Meta: Activate. Tick the Index option, Snippet, Video Preview, and Image Preview.
- Link Suggestions: Optional. We prefer to turn it off.
- Primary Taxonomy: Select None.
- Slack Enhanced Sharing: Activate.
- Add SEO Control: Activate.
- Bulk Editing: Enabled. This option is handy for editing multiple posts.
- Custom Field: You can leave it empty.
- Default Thumbnail Watermark: We prefer to turn it off.
Pages
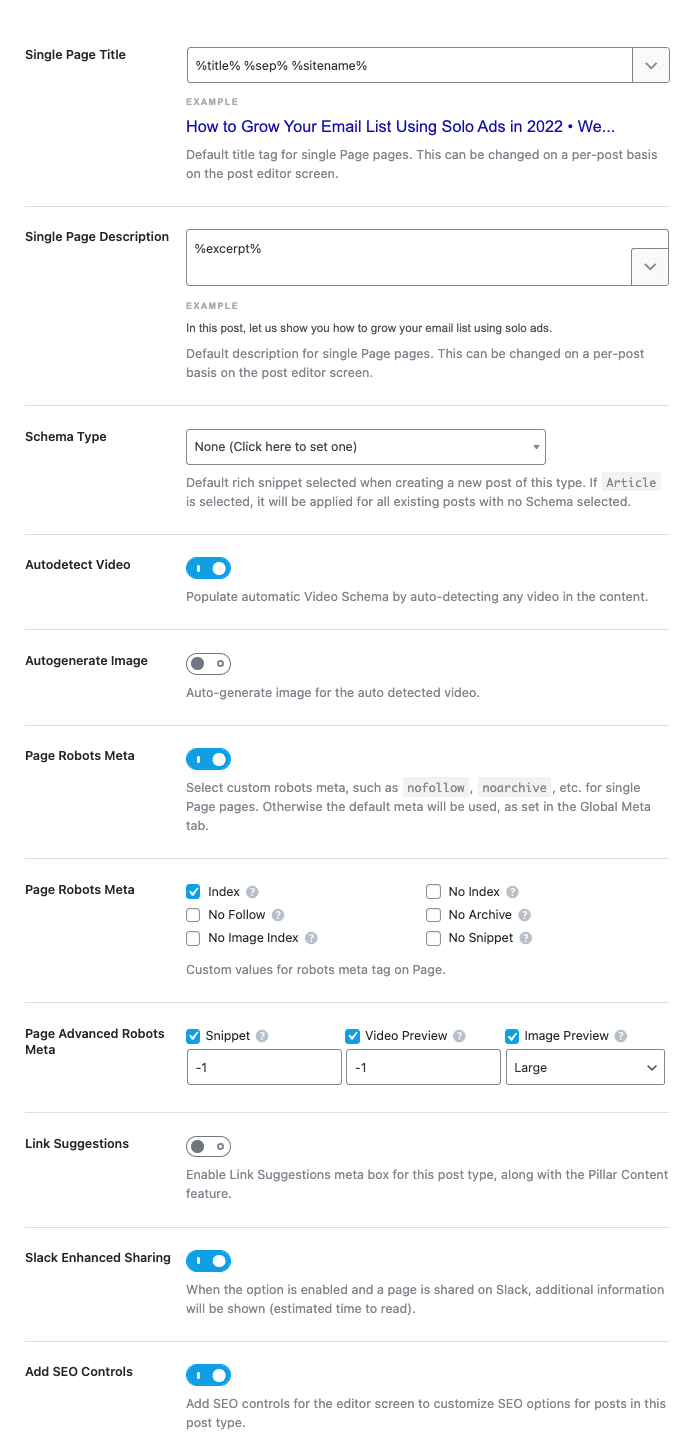
Most of the options are similar to the previous Posts menu.
Categories

Most of the options are similar to the previous Posts and Pages menu, except for:
- Remove Snippet Data: Activate.
Tags
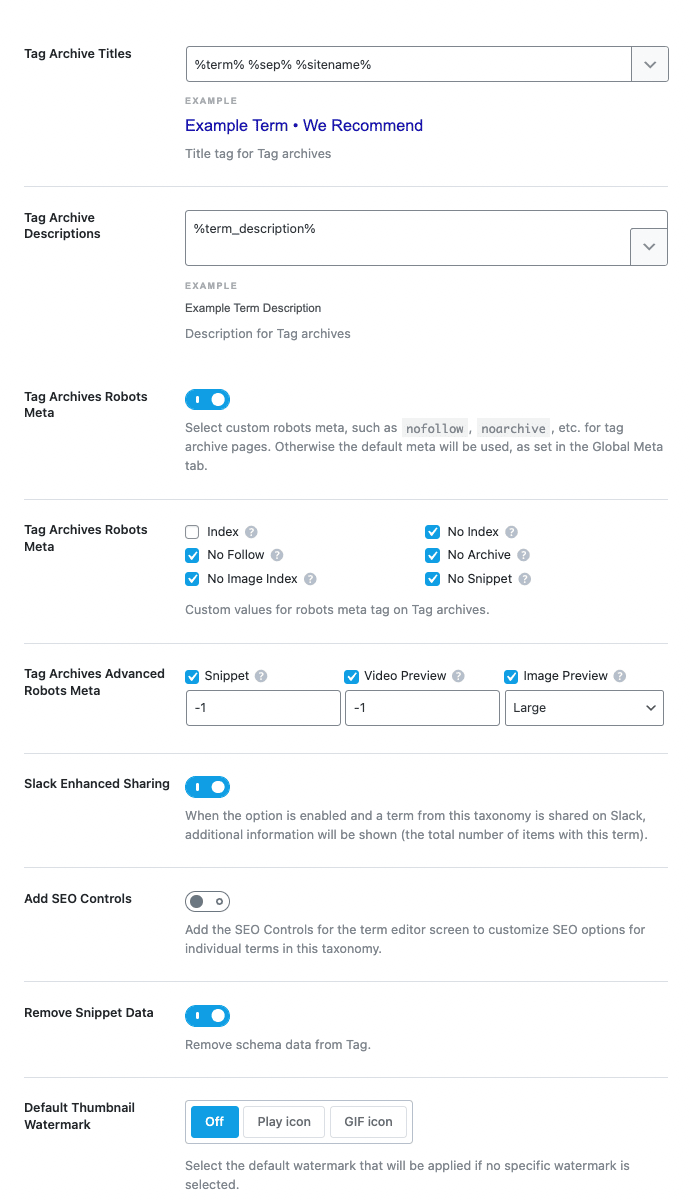
Most of the options are similar to the previous Posts, Pages, and Categories menu, except for:
- Tag Archives Robots Meta: Activate. Tick everything except the Index option.
- Add SEO Control: Deactivate.
- Remove Snippet Data: Activate.
After setting up your Rank Math SEO plugin, let’s move on to the second step.
Step 2: Understanding Rank Math SEO Analytics
If you’re using the free version, you won’t be able to access these analytics functions like us. This exclusive feature helped us identify our post SERP without leaving our WordPress dashboard. We will walk you through each menu tab and how you can use it to improve your Google ranking. Furthermore, we will provide you with a simple action plan you can follow to improve your content.
Dashboard
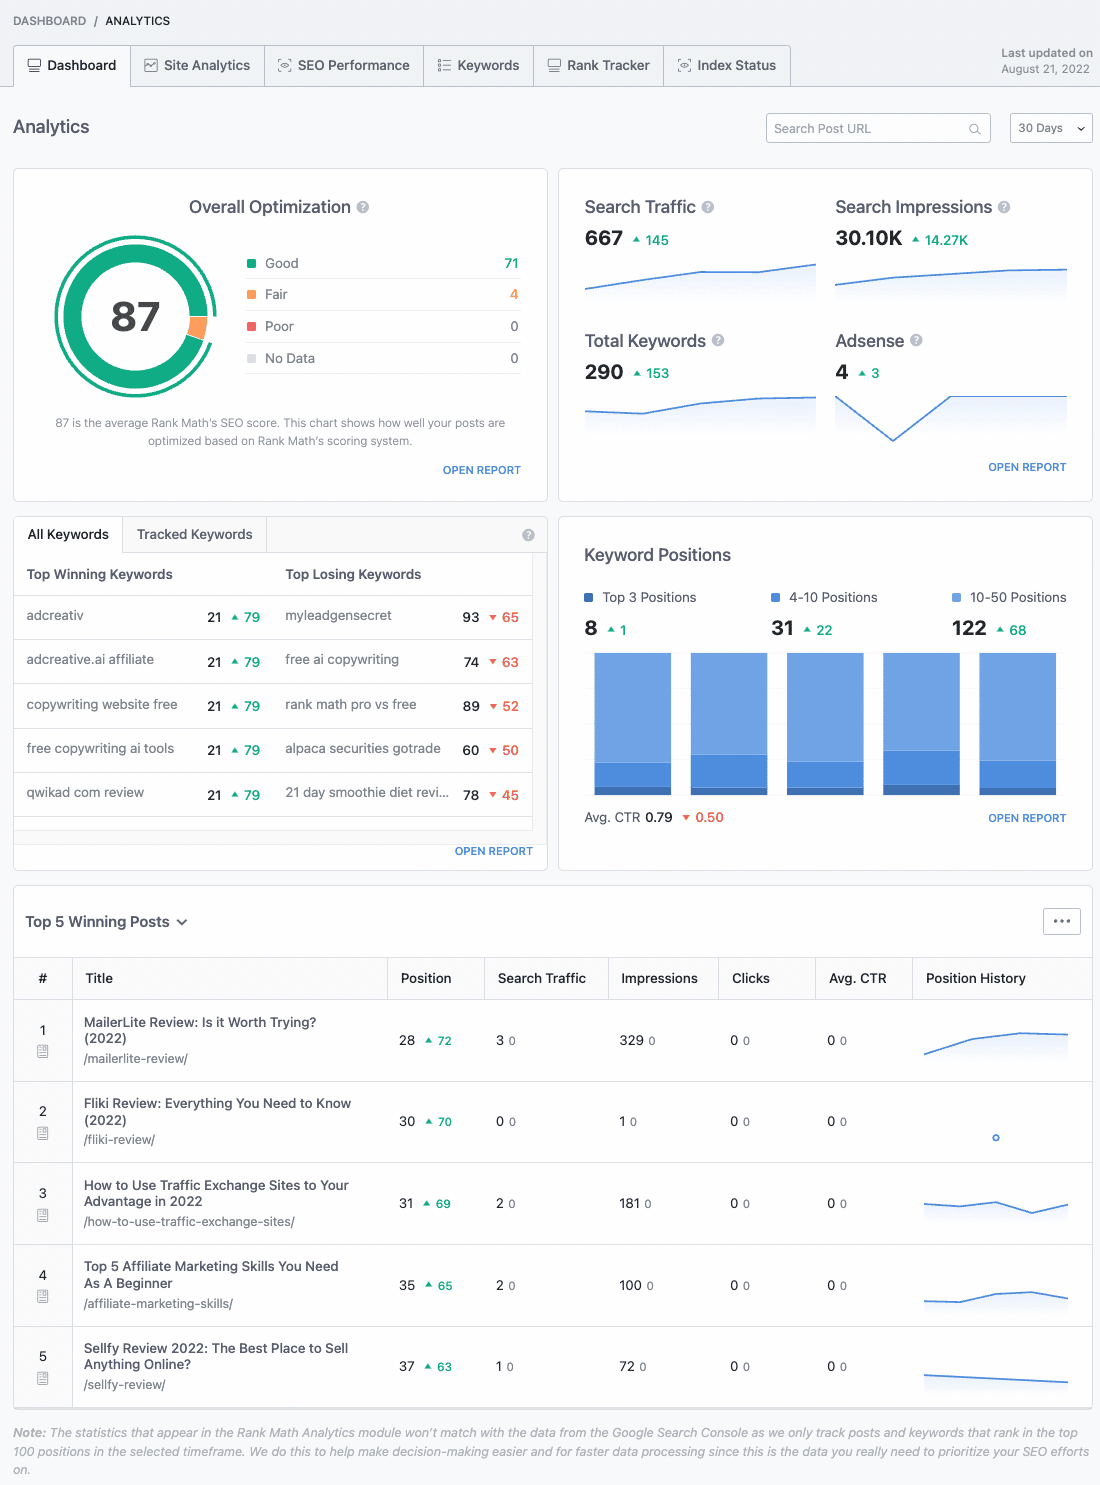
Inside this menu tab, you’ll see a similar dashboard to Google Search Console. It’s a summary of your website performance in terms of:
- Overall Optimization. The number you see is the average SEO score based on Rank Math’s algorithm. Even though it’s not that important, we believe it is better to keep everything in green or at least orange. We wouldn’t dare to leave our content in red.
- Google Search Console Integrations. You can see search traffic, search impressions, total keywords, and your AdSense earnings here.
- Top Winning and Losing Keywords. You can see which keywords are doing great and which are not.
- Keyword Positions. You can find your keyword positions in SERP. The more keywords you have on the top 10 list, you will get more traffic.
- Top 5 Winning and Losing Posts. You can see which posts are performing well and which ones are not.
A kindly reminder to utilize this dashboard is to see the note at the bottom that says the statistics in this Rank Math Analytics module won’t match the data from the Google Search Console since Rank Math only track posts and keywords in the top 100 positions in the selected timeframe. In other words, this could improve your decision-making process because your priority is to overcome the issue you might encounter inside this dashboard.
Site Analytics
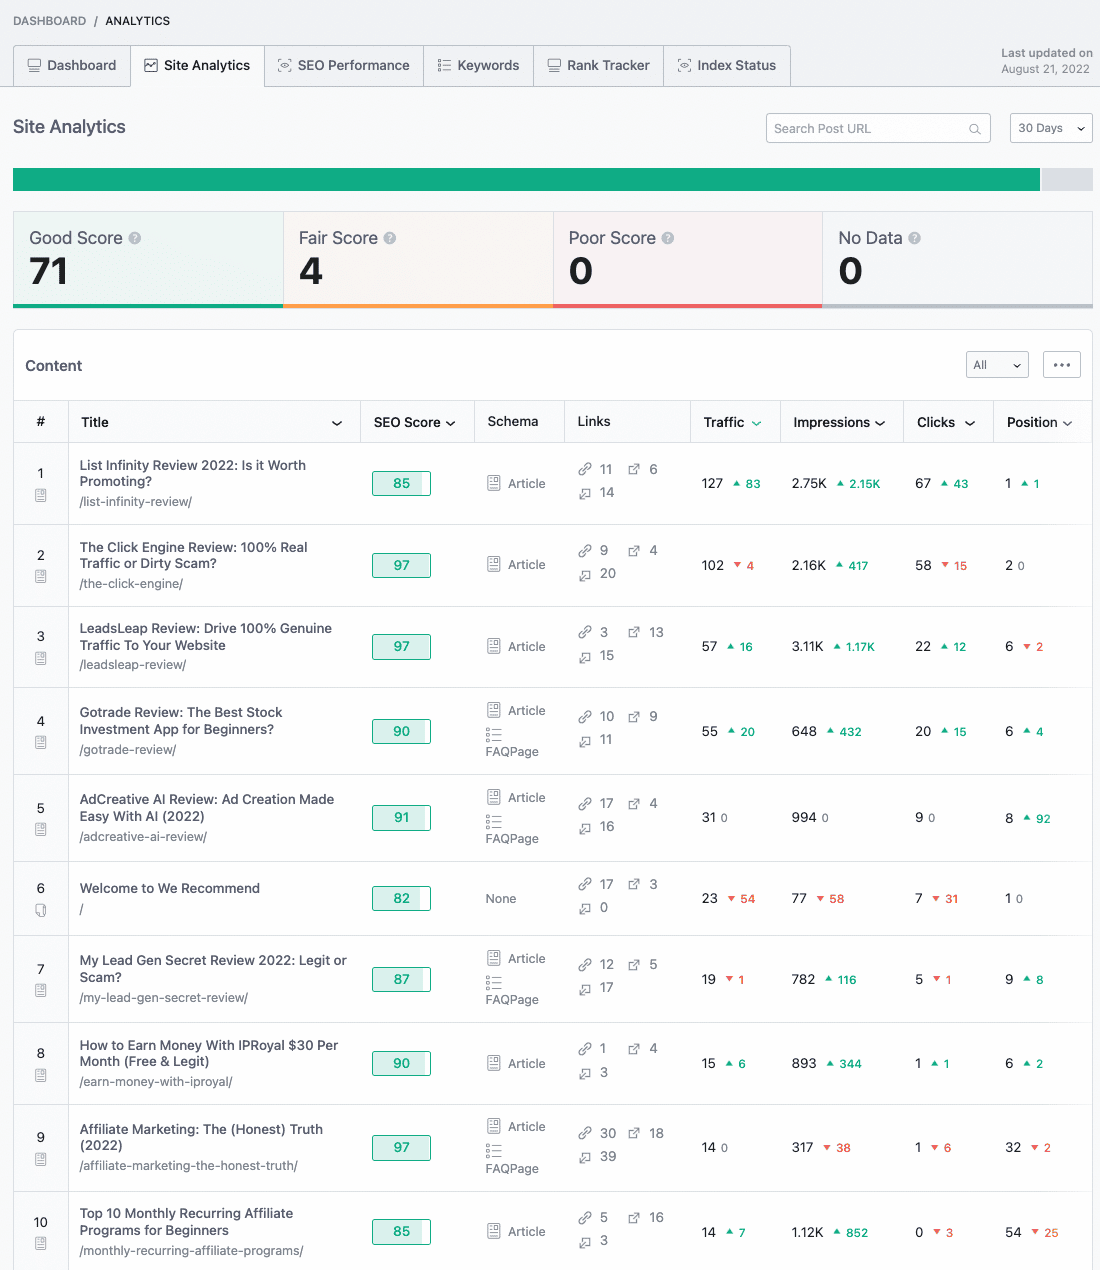
When you open this menu tab, you can see all the metrics you need to understand how your content is doing against the competition. You can sort your post performance based on Traffic, Impressions, Clicks, and Position. However, due to several Google Core updates in the past two months, these tips might not work since Google might rework its algorithm. But, generally speaking, paying attention to these site analytics could help you identify which content needs improvement and which one doesn’t.
Here are a few things we usually do to improve our post performances:
- Change the drop-down menu from All to Posts.
- Sort your posts based on Position from the smallest to the largest (arrow pointing upwards). If you see 0, that means Google hasn’t decided to rank your post. Based on our experience, this could happen when you just published your post, or Google might remove it due to low search intent.
- Sort your posts again based on Position from the largest to the smallest (arrow pointing downwards). Usually, we pay attention to:
- Posts with High Impressions and a drop in Position with more than 20, we could assume Google dropped the rank due to the quality of the content. In other words, people might find it not interesting because it appears on the search results, but people are not clicking. However, we usually crosscheck this data using WhatsMySERP. You can improve it by updating your content by providing more valuable information.
- Posts with more than 20 points drop in Impressions and Position. We could assume these posts are highly competitive, and you might want to consider adding more valuable information and length to your post. We suggest looking at what your competitors are doing and trying to write better content than them.
- This time, sort your posts again based on Impressions from the largest to the smallest (arrow pointing downwards). Typically, these posts should perform well, but you must pay attention if your post rank is not yet in the top 10. Based on our experience, we give more time and wait if it climbs up the ladder or not within two weeks.
- Lastly, sort your posts based on Clicks from the smallest to the largest (arrow pointing upwards). You must pay attention to the posts with 0 clicks but have a lot of Impressions. You might need to create another content covering the topic cluster so you can internally link it to boost your content exposure. This particular post is an example of how we do it.
SEO Performance
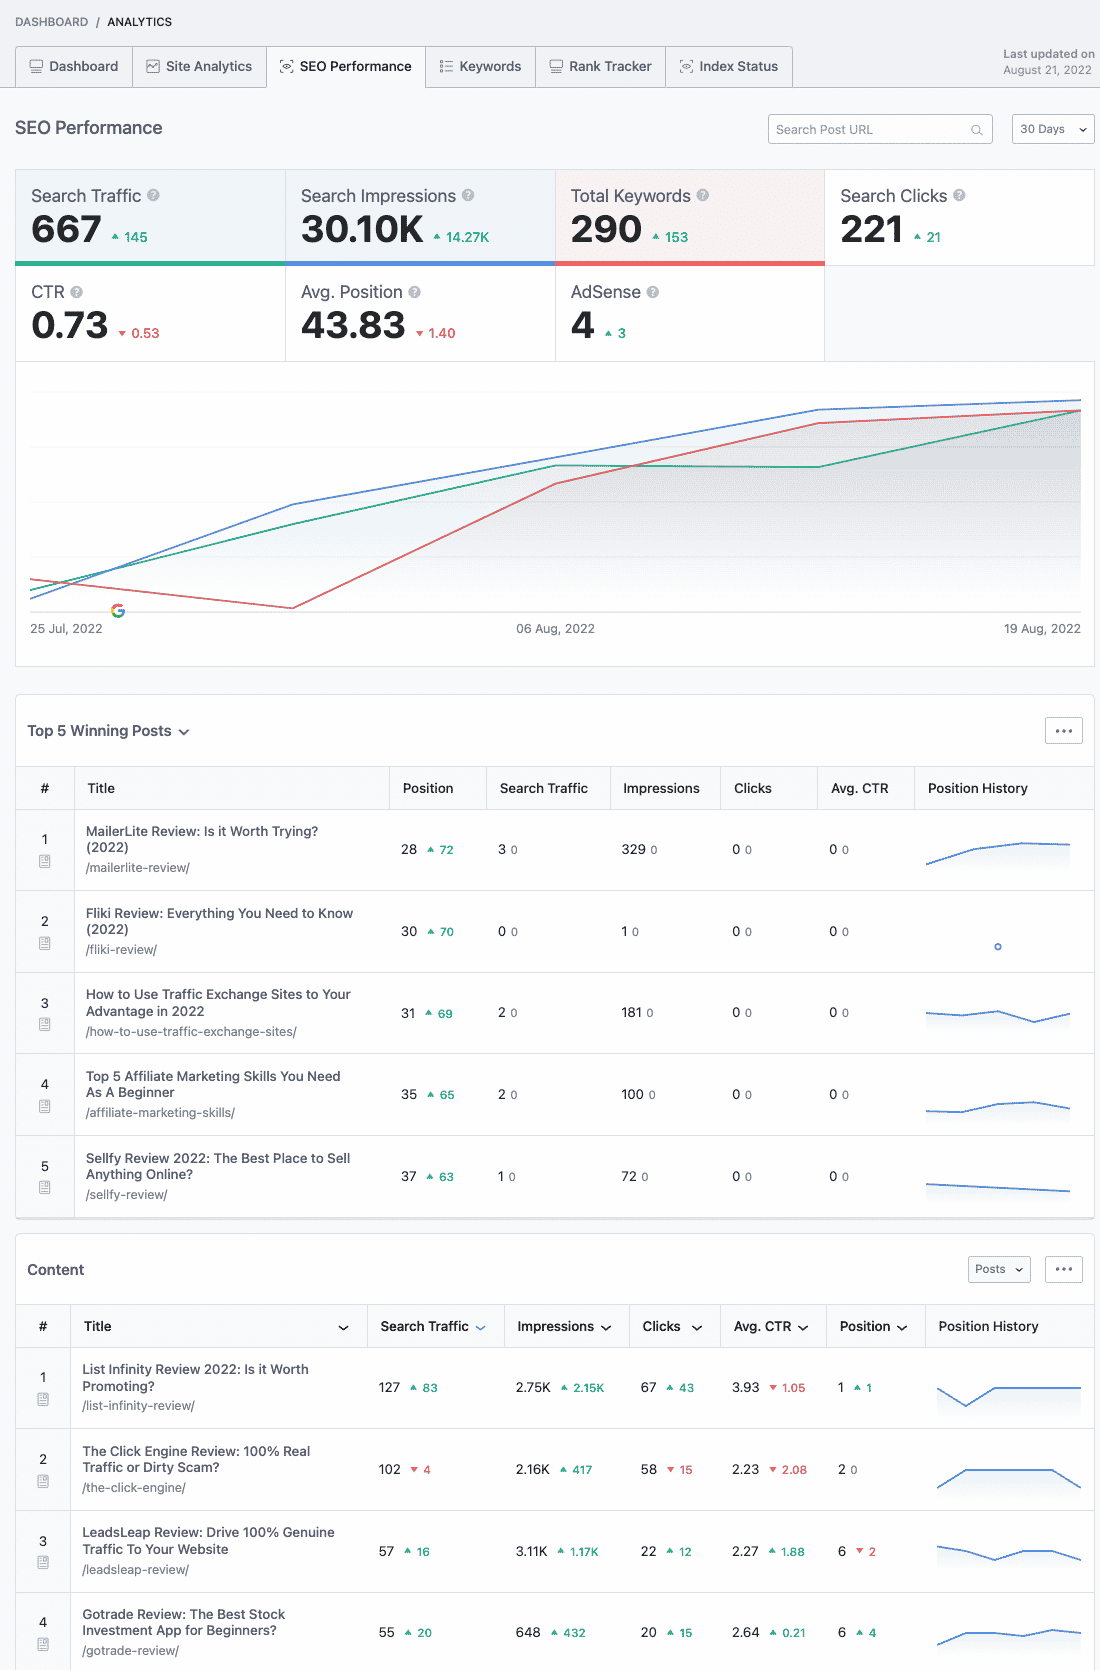
In the SEO Performance menu tab, you can access nearly the similar information you get in Google Search Console. We think it’s even better because you can see the position history of your content. So, you’ll know if your content is doing well or not. Moreover, you can also view the top 5 winning and losing posts based on your time preference. We usually set it on 30 days to learn more if our content gradually climbs the search ranking or not.
Even though the data you get is similar to what you see in the site analytics menu tab, you can find one additional metric in the SEO Performance tab. And that is click-through rates or CTR. In short, click-through rates are the number of search clicks divided by the search impressions.
When you head to the Content part at the bottom of this menu tab, you can see another column labeled Average CTR. Here is a thing you can do to analyze this column:
- Sort your data based on Average CTR from the largest to the smallest (arrow pointing downwards). You might want to pay attention to posts with declining CTR results and a Position History of more than 10 points. We could assume people might be clicking on the search results below your post, or you are competing with websites with high domain authority. One of the things you can do is to write a topic cluster to help Google understand the value of your site.
Keywords
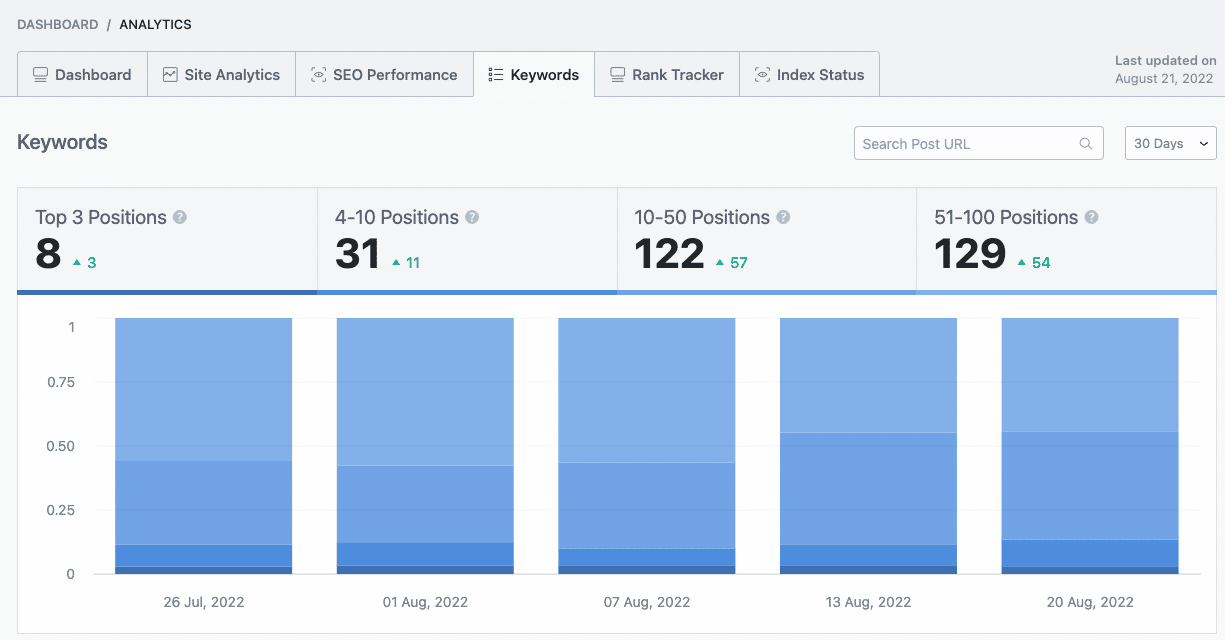
Inside this menu tab, you can find all the information you need based on Keywords. The first you might want to pay attention to is the number of keywords in the top 10 positions. Based on our stats, we can see that we got 8 keywords which got us in the top 3 positions when someone searches for that keyword, and so on.
Now here’s the best part. You can track your keyword positions when you head to the Rest of the Keywords section.
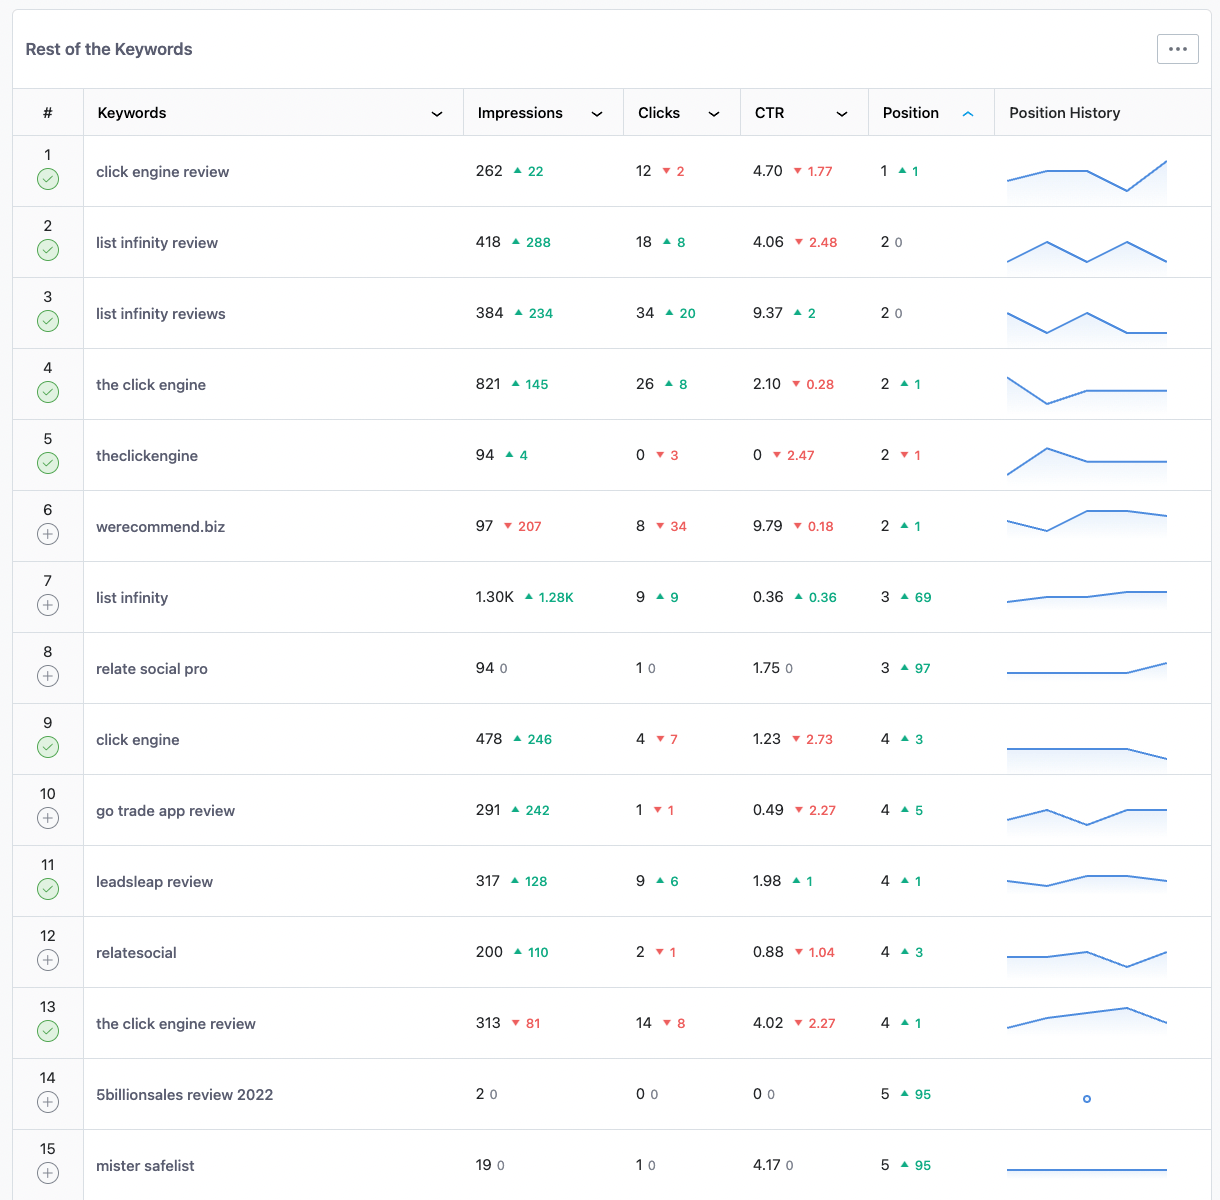
As you can see, there is a similar table as you saw in the site analytics and SEO performance menu. But, instead of showing you the content, it shows you the keywords and their position history.
When you use Rank Math, you can fill in as many keywords as you want to track. With the Pro version, you can track up to 500 keywords. If you write your content using the on-page SEO guide, you need to enter the primary focus keyword to your post. Rank Math will automatically add your targeted keywords to this menu tab.
Here are a few things you can do with the data in this menu tab.
- Sort your keywords based on Position from the smallest to the largest (arrow pointing upwards). You might want to pay attention to the first two pages because these are the keywords where your content ranks in the top 10 of Google search.
- Now, sort your keywords based on Position from the largest to the smallest (arrow pointing downwards). Pay attention to several keywords with High Impressions that makes sense. It means people are searching for that terms on Google, so you might want to create a new post or add them to your existing content for better exposure on the SERP.
- If you’re writing a review as we do, one of the best ways to track your keywords is when someone searches for the product without adding the word “review” at the end. For example, we are writing a review about The Click Engine, and the title of our post starts with The Click Engine review. When people search using only the product name—in this case, The Click Engine, you want your review to appear on the first page of SERP too.
- Hitting the + sign will add those keywords to your Keywords Manager.
Rank Tracker
You can also track your keyword performance based on your time frame preference. All of your targeted keywords will appear in this menu tab. Currently, you can select up to 6 keywords to track by clicking the graph-like icon below the number. You can use this feature to compare several keyword results.
Index Status
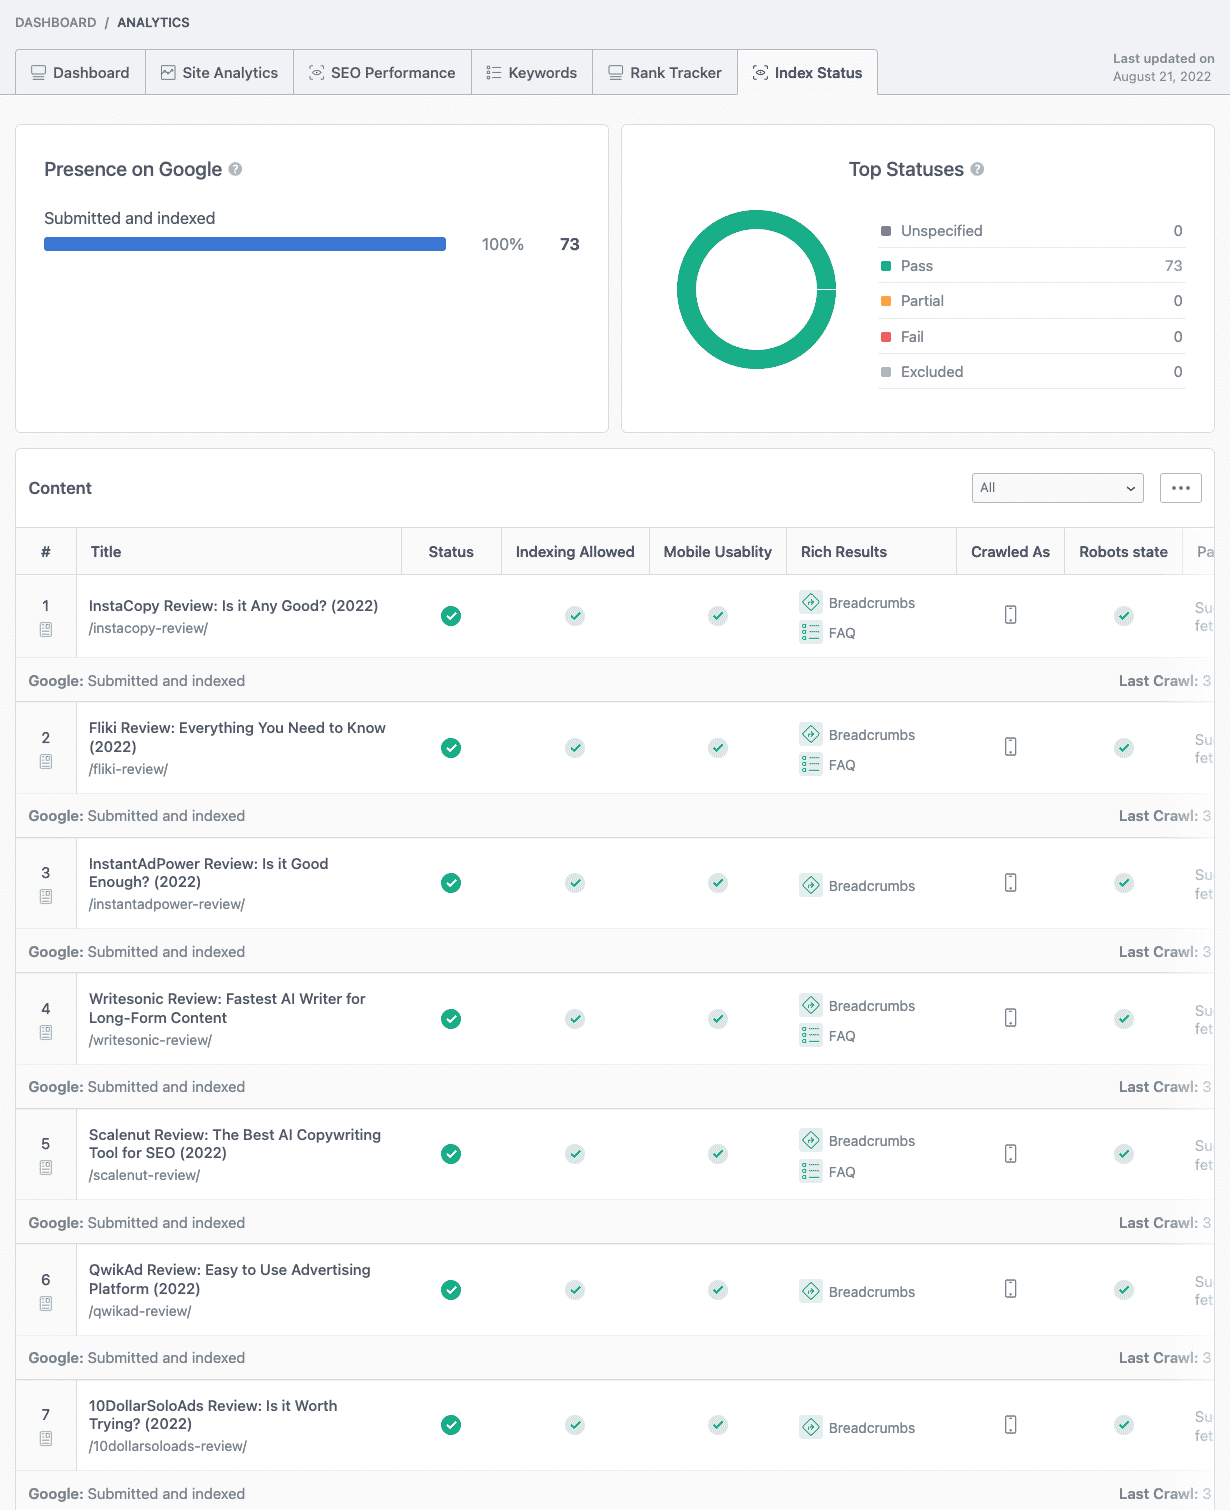
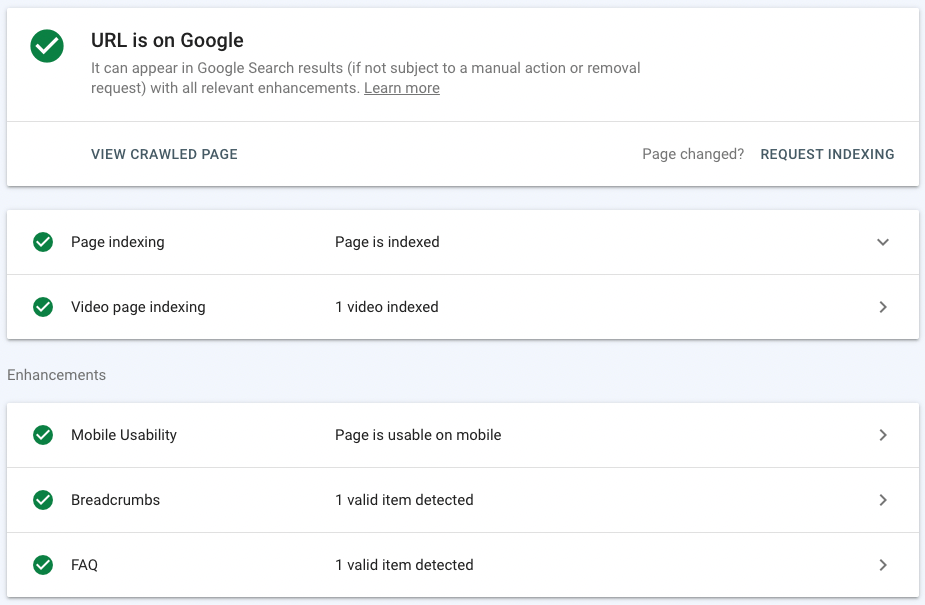
In the last menu tab, you can find out whether Google has indexed your post. Moreover, you can also identify which of your content has Rich Results, such as the FAQ feature. In our case, Google has indexed all of our posts. Yay! We will cover more about this in the last step.
Step 3: Adding FAQ schema to your post
One of the best ways to improve your Google ranking with Rank Math SEO is to add a FAQ schema to your post. A frequently asked question done right could enhance your visibility in SERP. Here’s how you can add the FAQ schema to your post.
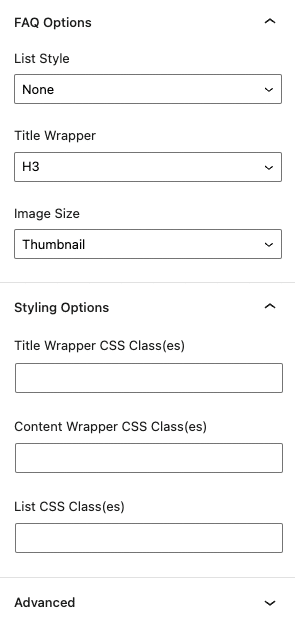
- If you’re using the block editor, click on the + sign and search for “FAQ by Rank Math.”
- Click on the three vertical dots (more settings) and select “Show more settings.”
- Change the Title Wrapper option from H3 to P.
- Add your questions and answers. We recommend highlighting your questions in bold to let them stand out.
Based on our experience, the more valuable information you give to your audience, the higher you will rank. So, adding a FAQ schema is always a good option. In fact, people read FAQs to help them understand things they want to know.
Step 4: Install The Instant Indexing Plugin
There are three steps before Google could rank your post in the SERPs:
- Crawl. To let Google crawls your post, you need to submit your Sitemap to Google Search Console. After that, you can use the URL Inspection on your Google Search Console to request Google to index your page.
- Index. The process Google takes to index your page may vary depending on many variables. However, you can accelerate the process by using the Instant Indexing plugin and combining it with your Rank Math SEO plugin.
- Rank. Once your page is indexed, Google will decide to rank your post based on your targeted keywords. Although nobody knows how Google runs its algorithm to rank, we recommend following Rank Math’s on-page SEO guidelines to help you write your post. However, one thing is for sure, avoid keyword stuffing in your post since it will only hurt your SEO.
Fortunately, we wrote an e-book to help you set up your Instant Indexing plugin.
Conclusion
Despite the recent and upcoming Google Core updates, we can say that Rank Math SEO helped us to improve our overall Google Ranking for our website. As we mentioned, we could never go back to using other SEO plugins, and we have always recommended others to use Rank Math SEO for their website. If you can afford it, don’t look back to upgrade to the Pro version. It’s totally worth the price and every benefit you get.