How to Create an Online Course With Payhip
Anúncios
In this article, let us show you how to create an online course with Payhip.
If you have a particular skill or knowledge to share and want to monetize it, creating an online course is one of the best ways to do it. Moreover, you can do it for free.
Anúncios
Even though there are several other platforms, such as Thinkific, Teachable, Gumroad, Sellfy, and many more, we would still recommend Payhip to host your online course for free. In fact, we host our online course on Payhip, too!
However, this guide assumes you already have a course outline and material ready for publishing. If you haven’t got that, it’s better to start working on your course before publishing it on Payhip.
Anúncios
Without further ado, let’s dive in!
How to Create an Online Course With Payhip?
Apart from creating a free account, you need to have your online course material ready to be published. You can use Payhip to help you manage everything, from hosting to handling payments. Moreover, you can ask your students to enroll as an affiliate to promote your online course and earn a commission. To think that all of these features are available for free is a no-brainer deal for us.
Step 1: Create Your Free Account
The first step in creating your online course on Payhip is to sign up and create a free account.
Step 2: Set Up Your Online Course Curriculum
After signing up, you need to give a name to your online course. Don’t worry about this, you can change it later.
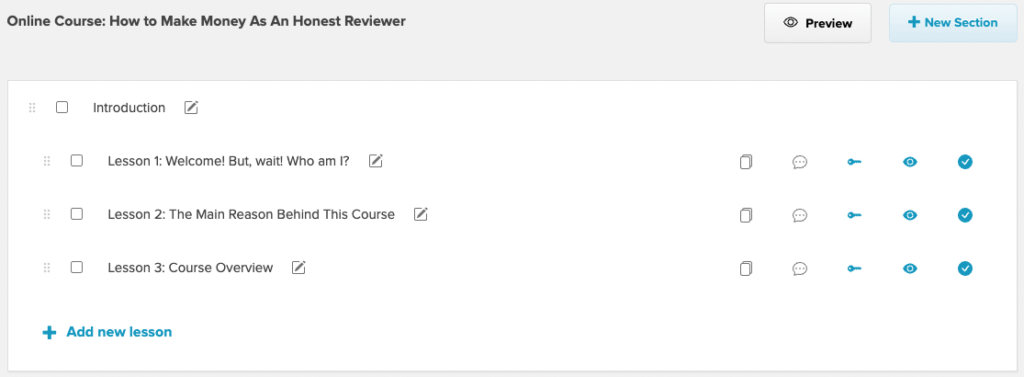
After that, you can start by adding your online course curriculum, module, and lessons. This step is essential to help you see your online course structure. To add a new module, click on the + New Section button. Then you can add new lessons to each module by clicking on the + Add New Lesson. Give it a name, and you’re done.

Now, you might be wondering what all these buttons mean. There are several customizations you can do with your online course, such as (from left to right):
- Duplicate Lesson. This button is handy when you want to create a pre-assessment and post-assessment quiz like we do. So, you don’t have to rewrite all the questions, simply duplicate them, and you’re good to go.
- Turn on Discussion. If you want your student to communicate with you by asking further questions, turning on this button will provide a discussion area at the end of the lesson. We use it for our core modules since our students might have related questions about the topic that we didn’t cover yet.
- Prerequisite Option. As the name says, this button allows you to make your lesson a prerequisite. In other words, your student can’t jump from lesson 1 to lesson 3 without finishing lesson 2 first. On other platforms, you can’t do this as a free member. That’s why we love Payhip.
- Free Preview Option. When you create your online course, you might want to give your potential student a free preview so they can get an idea about it. This feature does that. You can let anyone take a sneak peek for free without paying for your online course.
- Publishing Option. When you’re ready with your lessons, you can publish them by turning this button on.
Step 3: Set Up Your Lessons
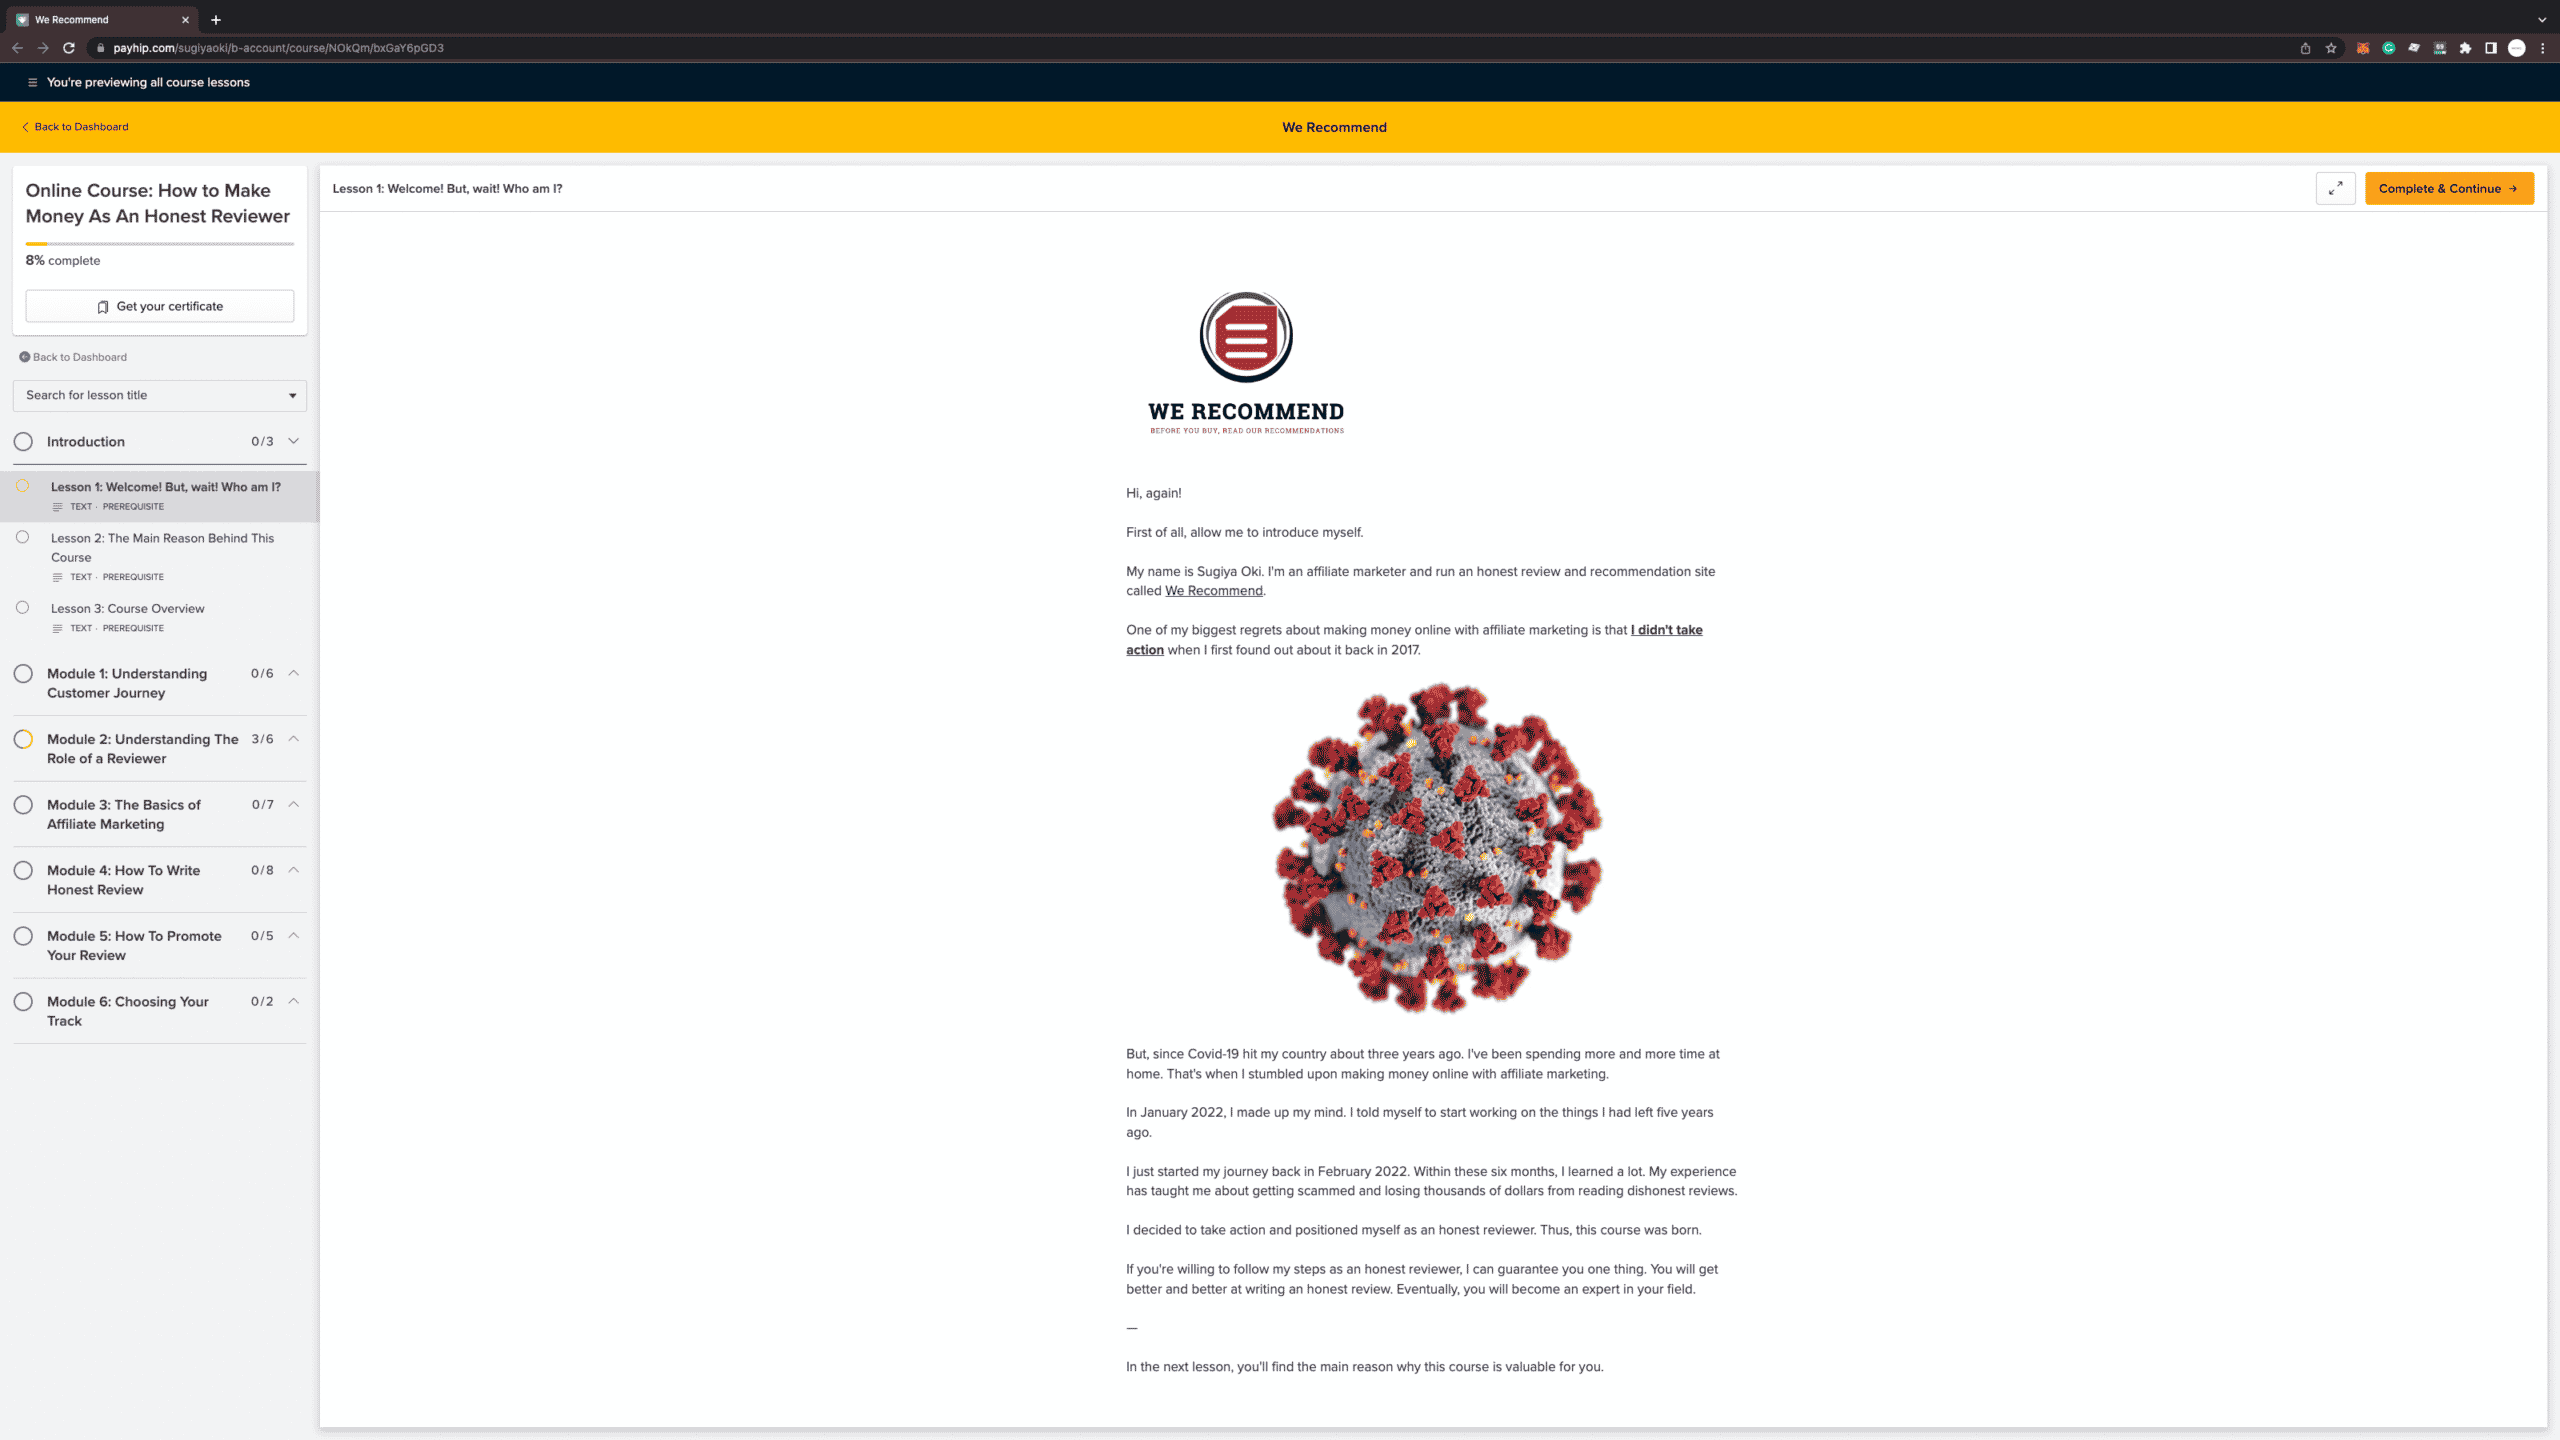
Now that you have created your online course curriculum, it’s time to fill it up with lessons. When you click on one of the lessons, you will see a form like this screenshot below.
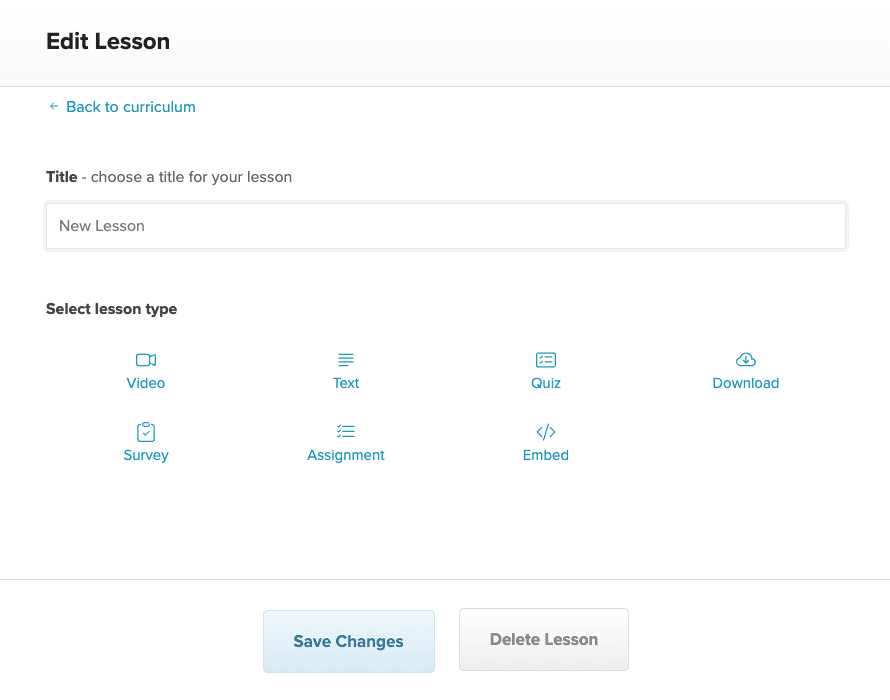
There are various lesson types you can create with Payhip. In this case, we’ll show you each one of them.
Video Lessons
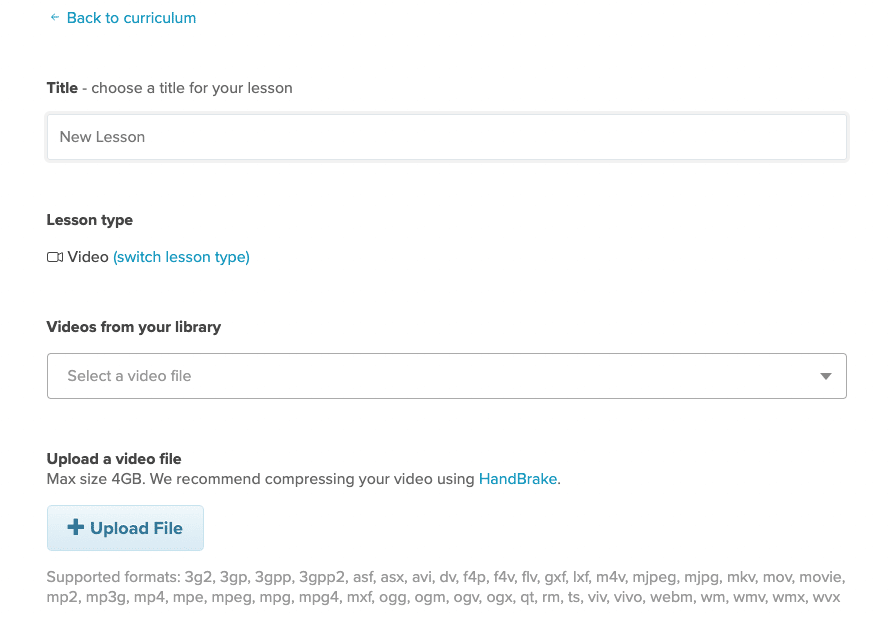
Creating video lessons is a great way to interact with your students. Payhip recommends you compress your video using HandBrake. This free software is available on Mac and allows you to create a web-optimized video without compromising quality. Payhip supports almost any video format, and you can upload a video up to 4GB, which is suitable for high-resolution videos.
You can also create additional text for your lesson and add files to download for your students. This handy feature is great when you want to upload a cheat sheet, checklist, or forms to support your online course.
If you intend to create a video, there are various online video editing tools you can choose, such as Fliki and FlexClip.
Text Lessons
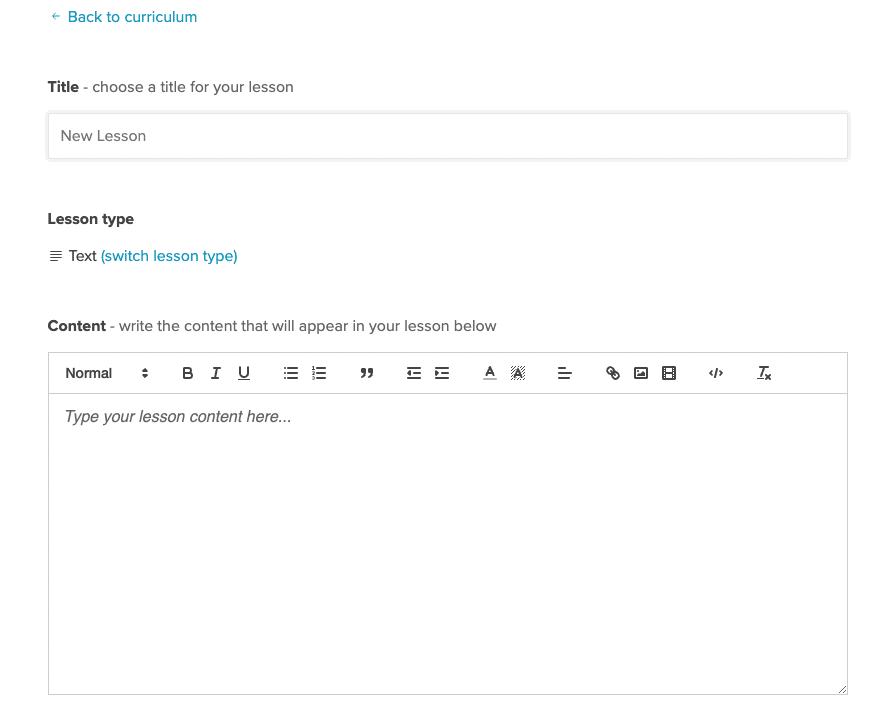
A text-based lesson is one of the most basic forms of an online course. You can write your explanations and learning points using this feature on Payhip. Adding multimedia files such as images or videos is possible with Payhip.
However, there is one limitation, and that is to choose different font types for your lessons. Even though you can customize them in the Course Player Settings, it would be better if we could change the fonts and the size of the headings to match our taste. Other than that, everything else is pretty decent.
Quiz Lessons
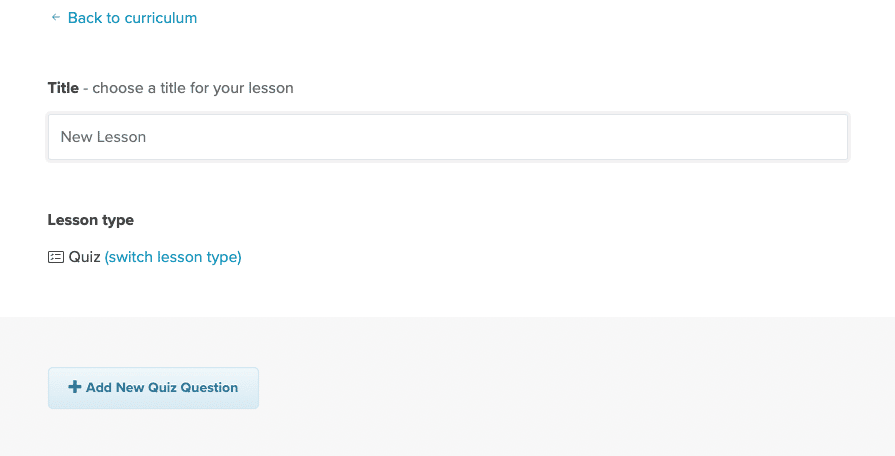
Personally, this is one of our favorite types of lessons. It is essential to ensure your students actively learn throughout your course, so creating a quiz is a great idea to help them.
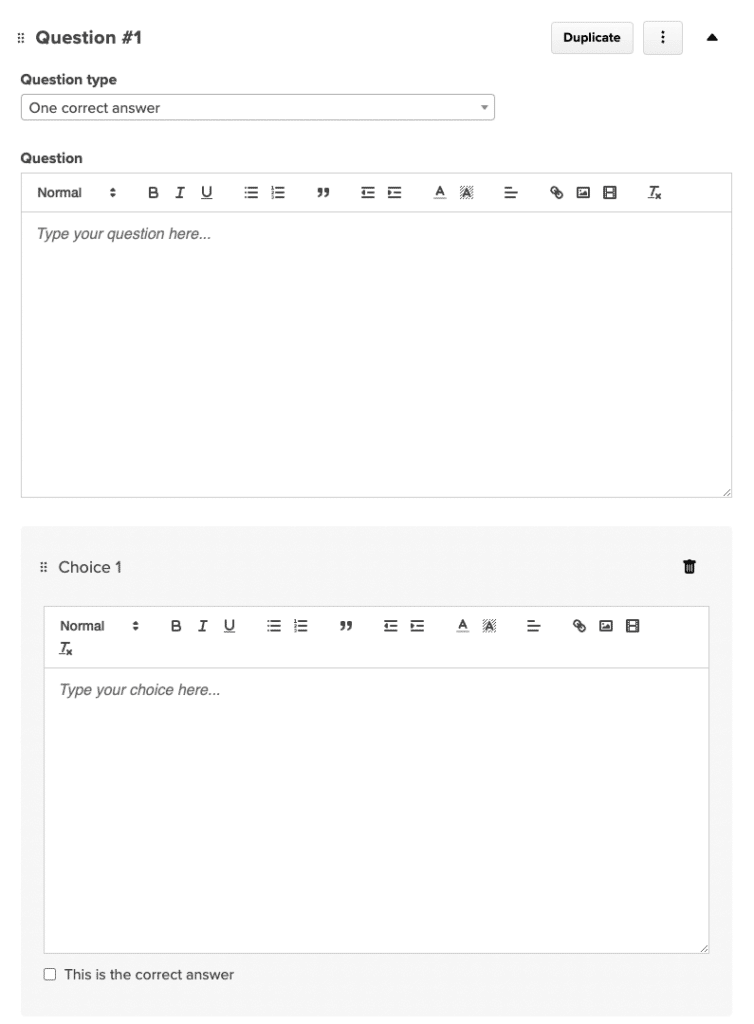
You can create as many questions by clicking the +Add New Quiz Question. You’ll get the same format you see in the text lessons to add your questions. Moreover, you can create a question type with one or multiple correct answers.
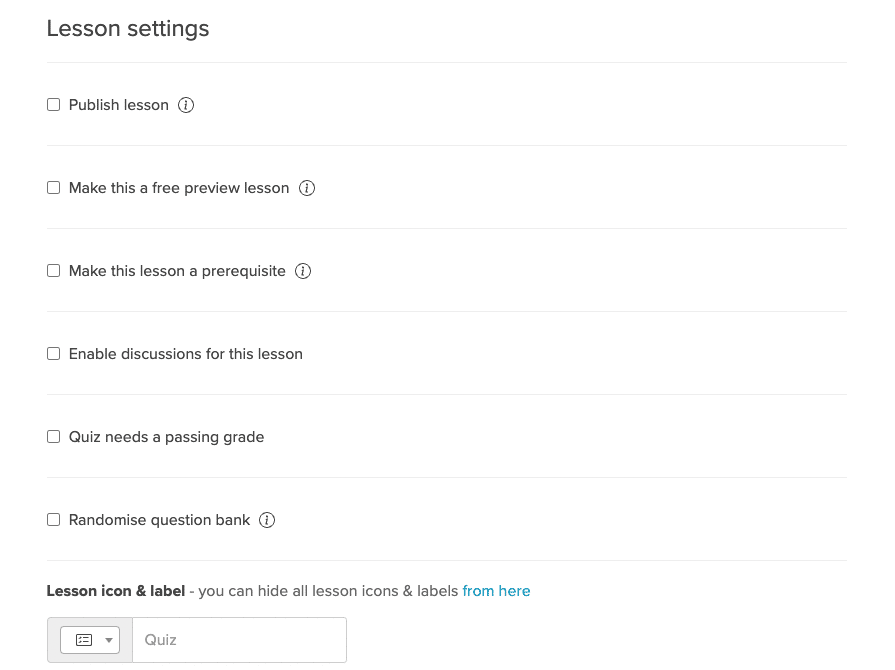
In addition, when you go down to the lesson settings, you can set your quiz with a passing grade. So, your students can only continue to the next lesson when they answer enough correct answers. Another thing you can do is to let Payhip randomize the questions. It’s a handy feature to ensure everyone is not getting the same sequence of questions when they enroll in your quiz.
We use this feature to create a pre and post-assessment quiz and require our students to get a 100% score on the post-assessment to continue their lesson.
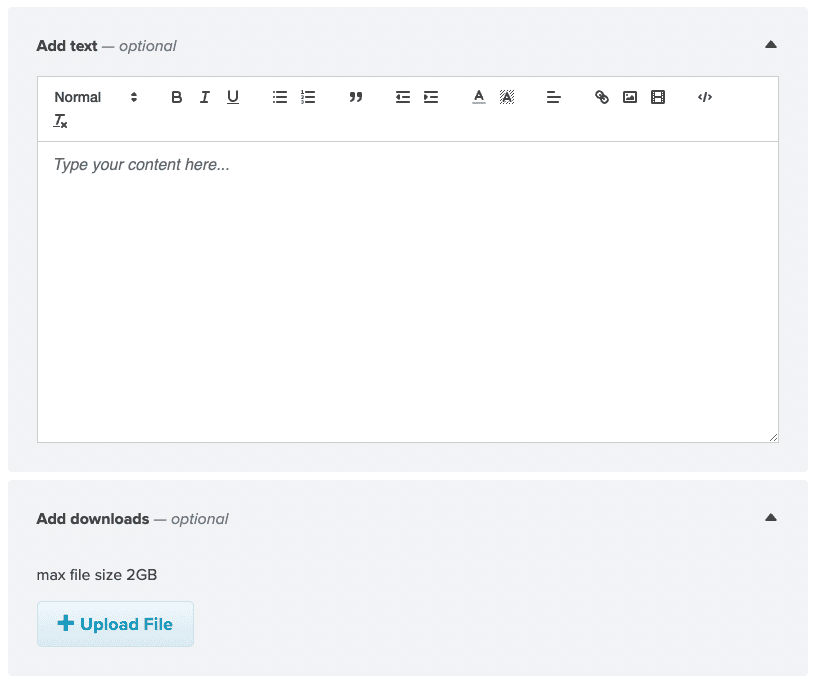
Download Lessons
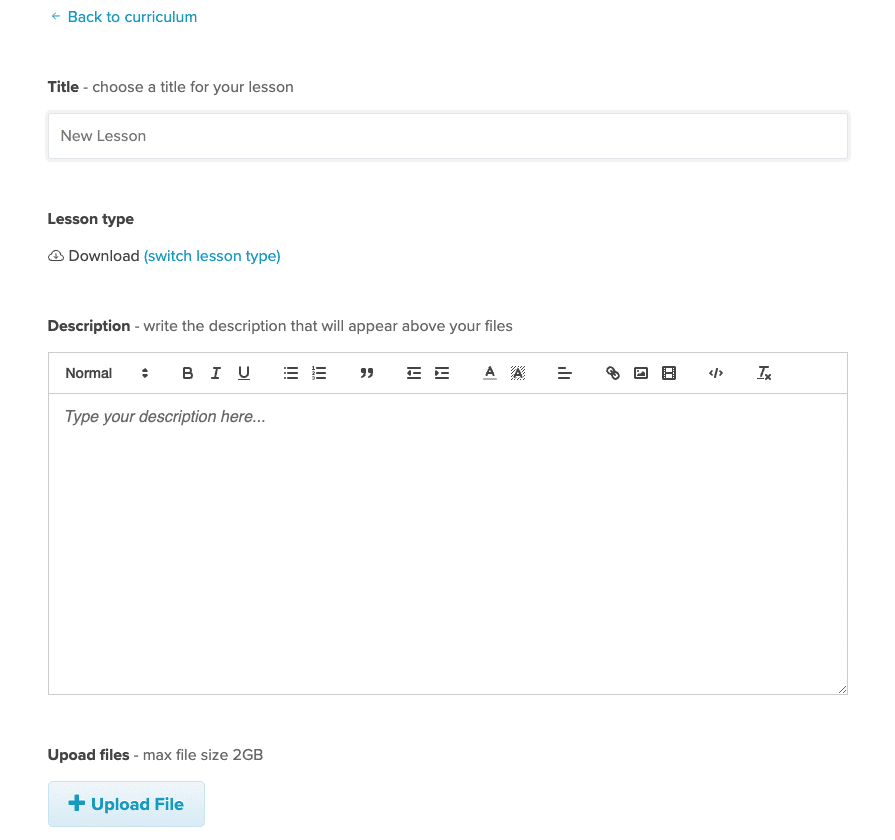
Another great feature to use is when you want to give your students homework or file for them to download. You can write instructions for your students and let them download the file. The maximum file size is 2GB, which we think it’s more than enough for most cases.
Survey Lessons
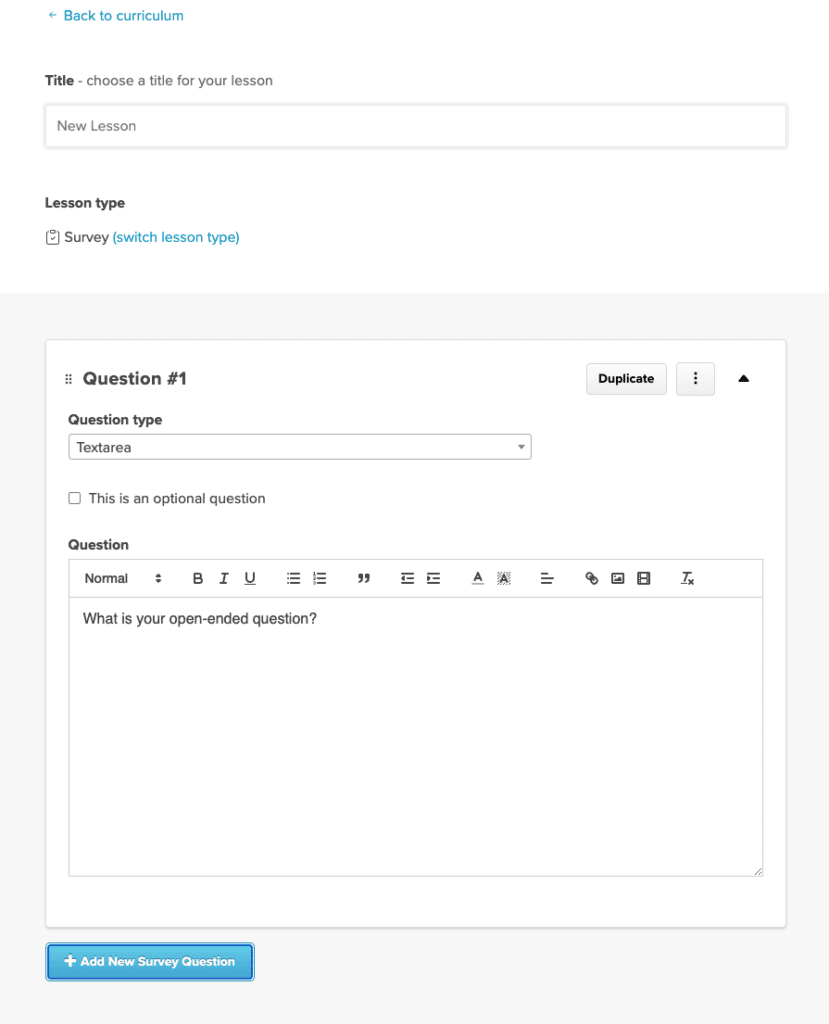
Sometimes, you might want your students to fill out a survey before enrolling in your course, so you can understand their problems and expectations of your online course. This feature enables you to do that.
You can set several open-ended questions and let your students fill them out. You can also mark your question when it is an optional question that your student doesn’t have to answer. It’s handy when you want to ask for feedback and opinion about your online course.
Assignment Lessons
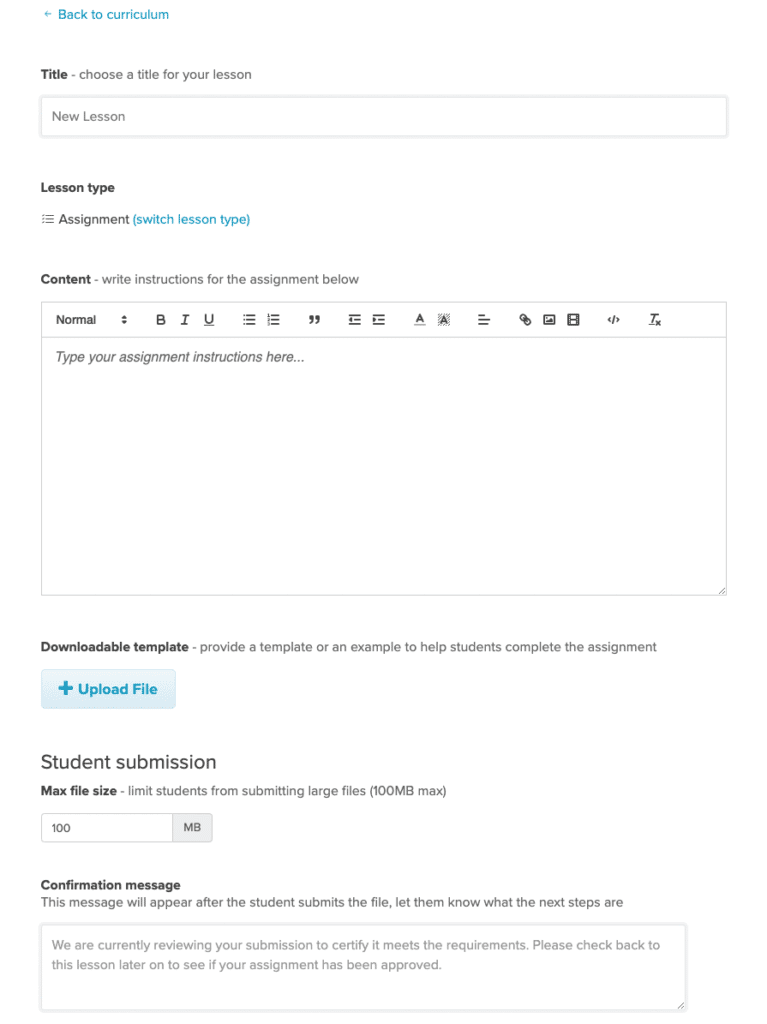
This is a bold feature to use when you want to ensure your student is doing their homework. While the Download Lesson only allows you to let your students download a file or a template, this feature allows your students to download and upload their homework.
In addition, when a student uploads their file, you can also create a confirmation message with further instructions. This feature is handy if you want your students to apply what you have taught in your lessons.
Embed Lessons
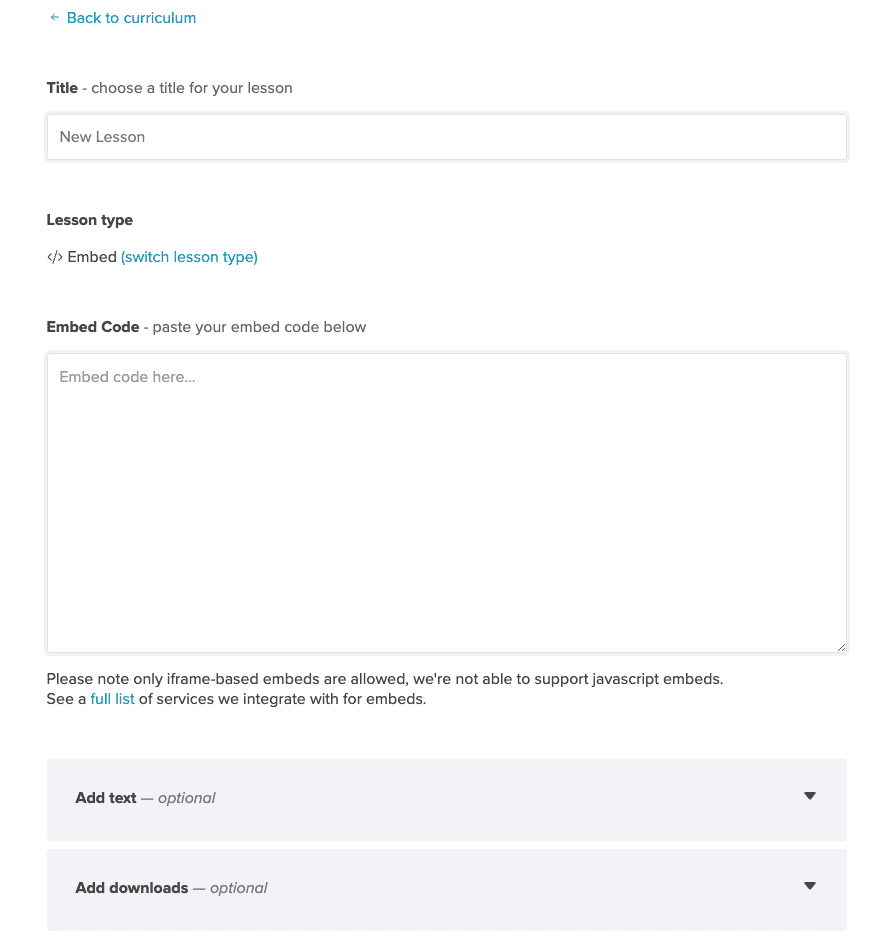
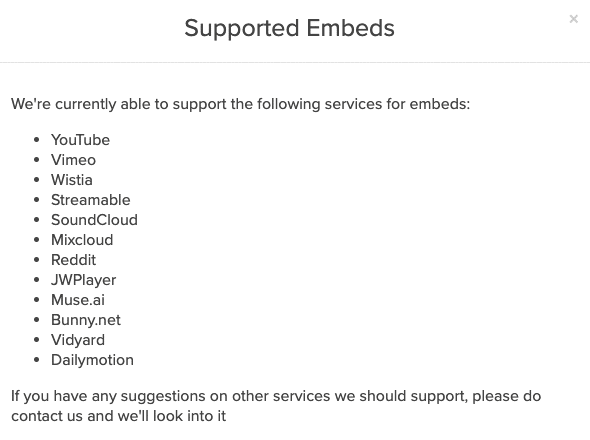
The last type of lesson you can add to your online course is the Embed feature. This feature is handy if you’d like to embed a YouTube/Video/Wistia video in your lessons. Moreover, you can also embed an audio type of lesson for your students. Below are the lists of supported embeds you can do on Payhip.
Step 4: Set Up Your Course Players
Since an online course is a digital product and you will be hosting them on Payhip, you need to set up a few things before publishing. You can do this by clicking the Settings menu on Payhip.
Basic Settings
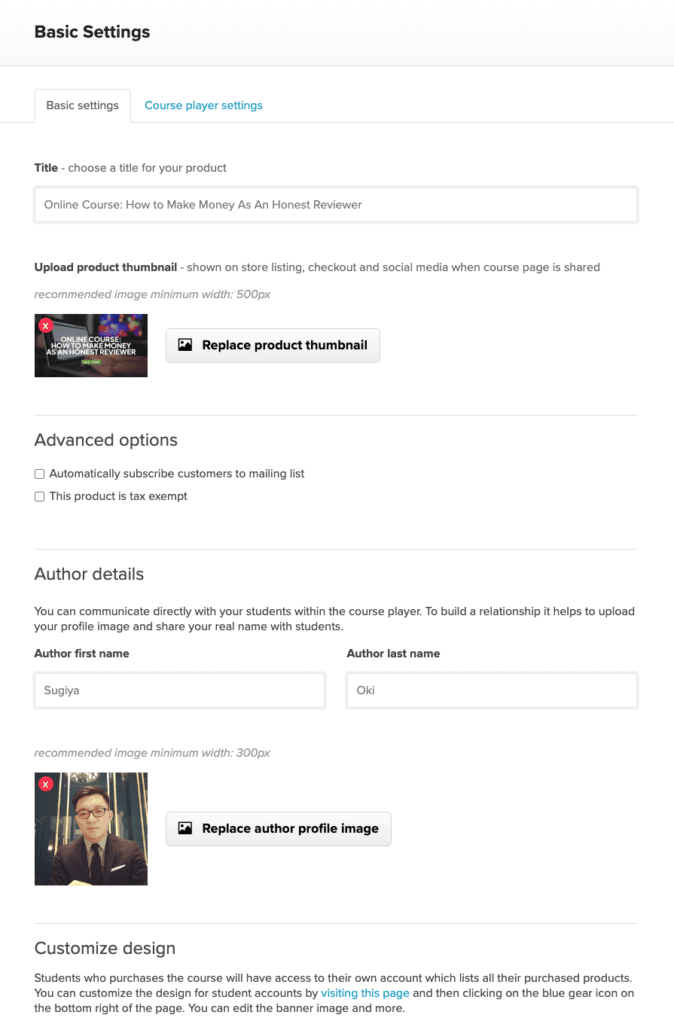
In this menu tab, you can change the name of your online course if you need to. Another thing to do is upload your product thumbnail for your online course. If you have no idea how to design your product thumbnail, we recommend using Canva, Visme, or DesignCap to help you.
Within the course player, you can communicate with your students. That’s why adding a profile image and your real name as an author will help you build engaging interactions with your students.
Course Player Settings
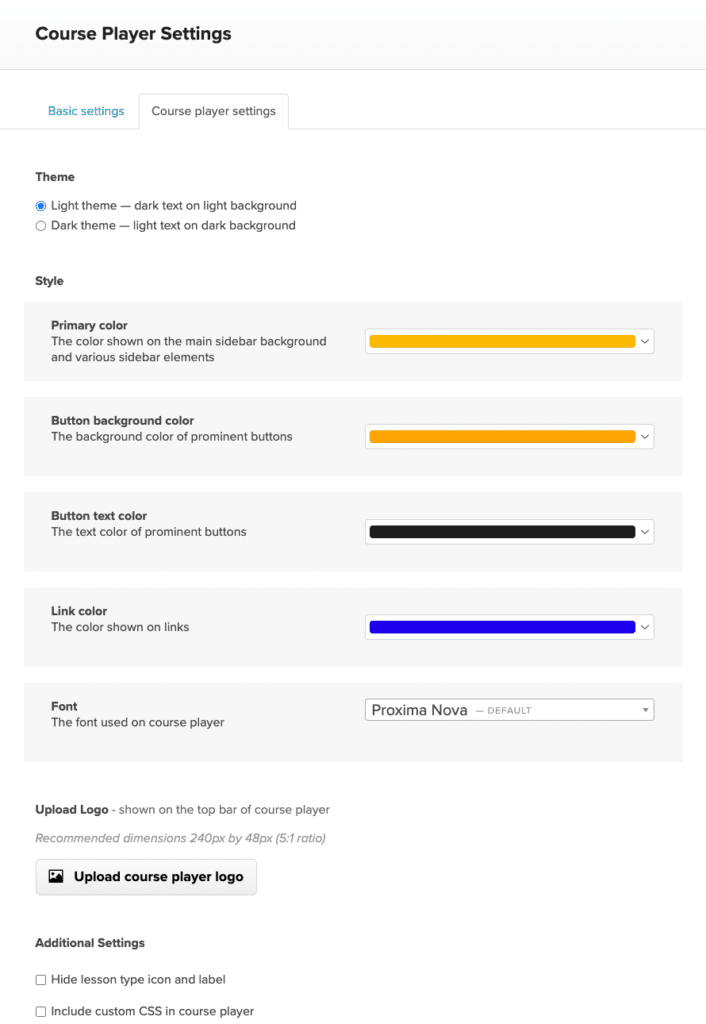
You can customize your course player’s settings, such as setting your theme, styling, logo, and font in your course. We strongly recommend you change at least your primary color and button color since the default color is Payhip’s brand color, which is purple.
Here’s a preview of our course player.
Pretty decent, isn’t it?
Step 5: Set Up Your Pages
One of the most essential parts of your online course is none other than creating a decent sales funnel. At first, we thought it would be a challenging task that involved coding, but it turns out that the process is super easy!
Sales Page
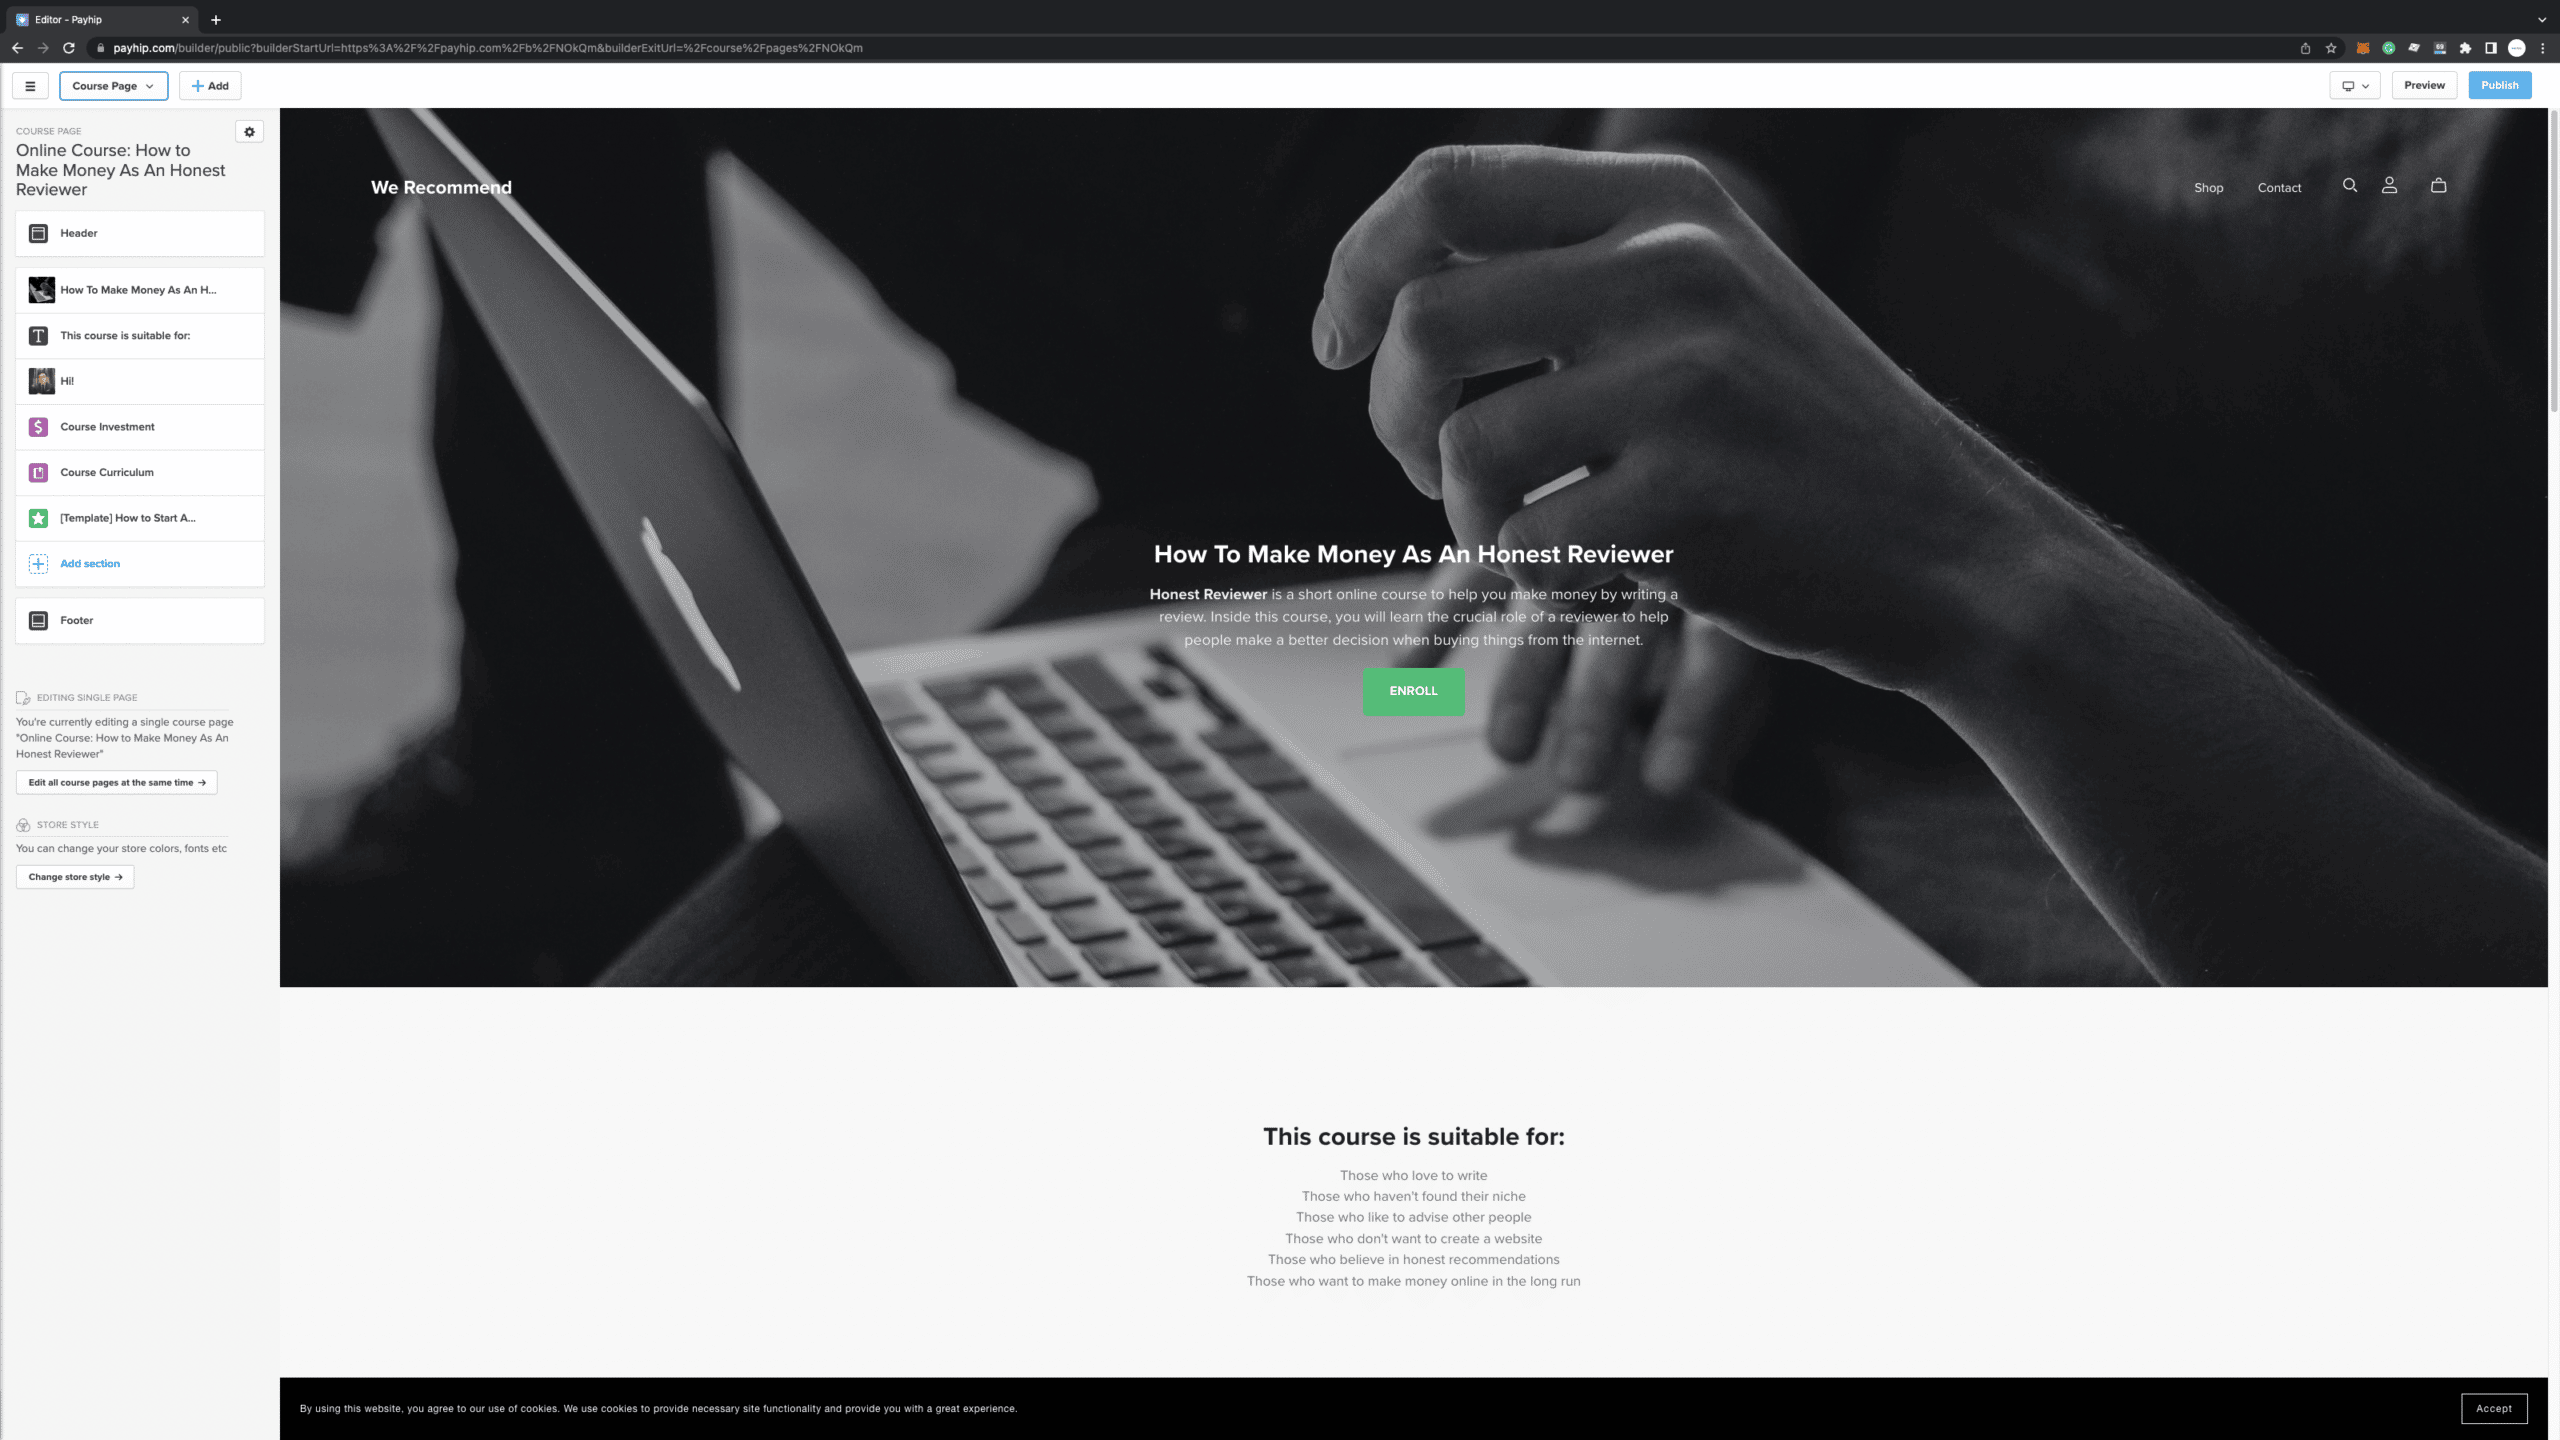
As you can see, Payhip allows you to create a sales page for your online course for free. The user interface is friendly enough for beginners like us. You can access everything from the left sidebar and customize them as you like. More importantly, your sales page is already mobile-optimized, so when your potential students see this sales page on a mobile device, it will look stunning as they see it on a desktop. Feel free to see it for yourself.
Checkout Page
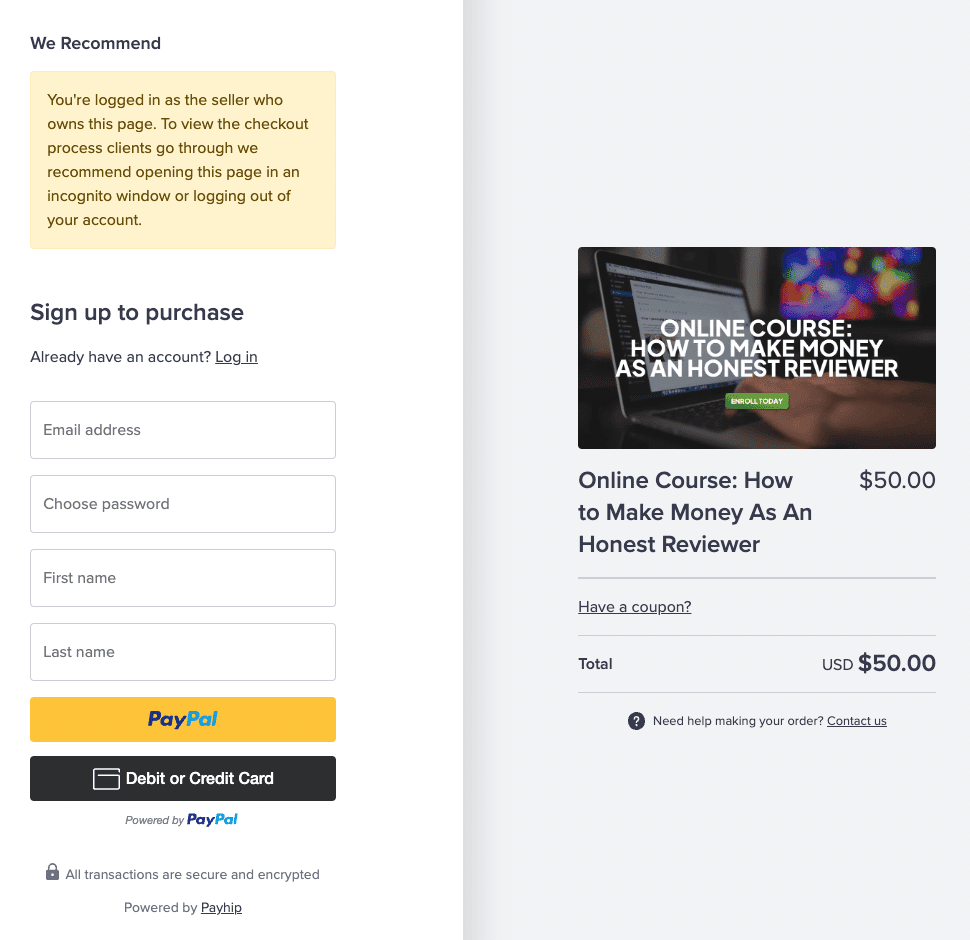
When your students want to enroll in your course, they will select a pricing plan and goes to the checkout page. You can’t customize this page, but it’s pretty good already.
Thank You Page
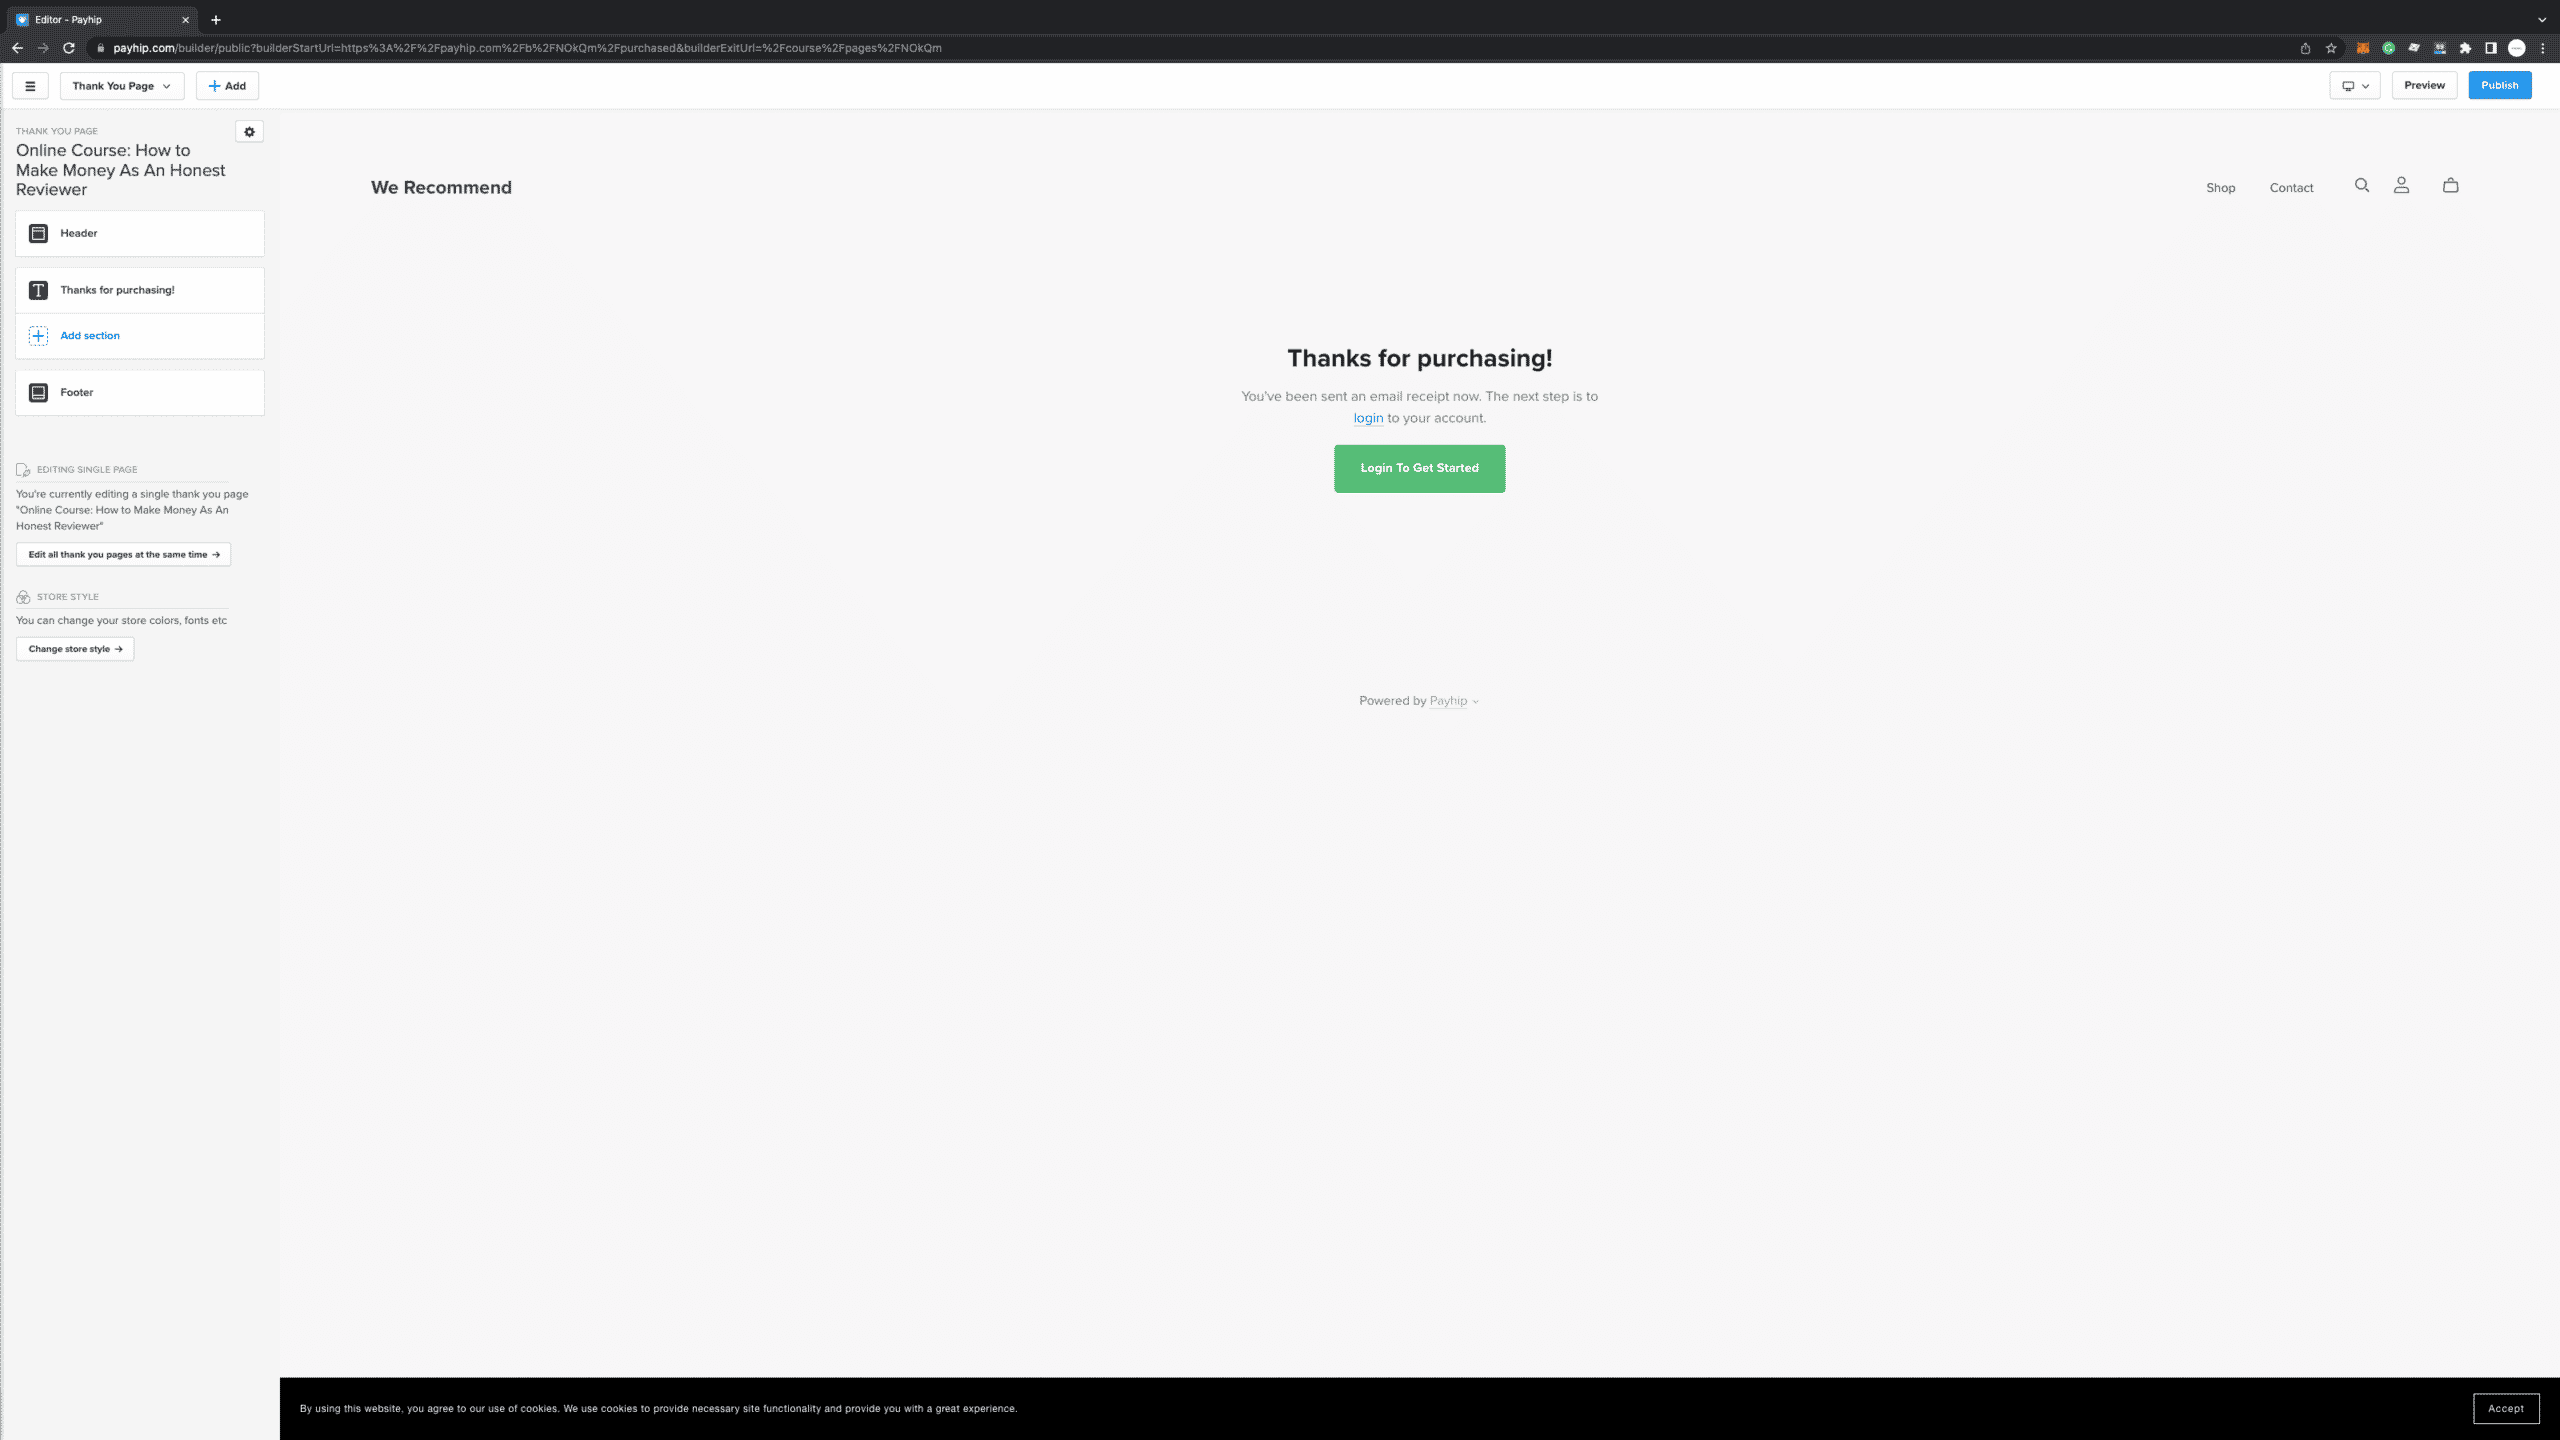
After your students complete their purchase, they will go to the thank you page. By default, this is the page they will see. We recommend not changing various elements on this page because you want your students to focus by logging in and starting to visit your online course.
Step 5: Pricing Your Course
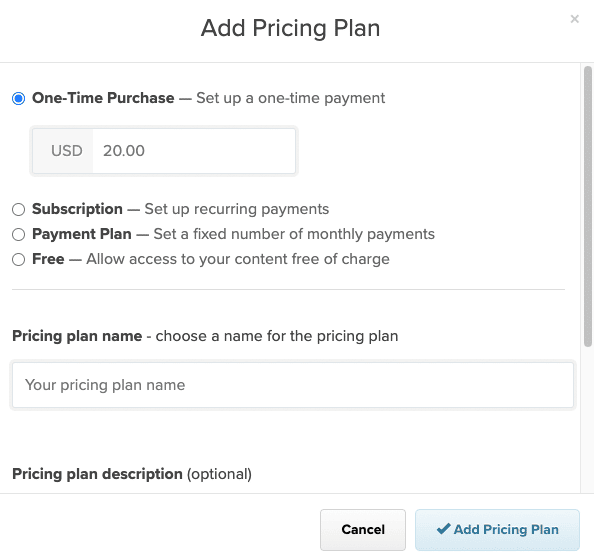
Now, it’s time to set up pricing for your course. When you go to the Pricing menu on Payhip, you can click the + Add Pricing Plan button to set them up. Fortunately, Payhip provides you with several pricing plans:
- One-Time Purchase. You can set up a one-time payment for your online course.
- Subscription. You need to connect your Stripe account to set up a subscription plan. Currently, Payhip does not support PayPal subscriptions. You can set up a recurring payment weekly, bi-weekly, monthly, quarterly, per semester, or annually.
- Payment Plan. If you’d like to provide a custom payment plan for your students, you can do it with this option.
- Free. Setting up a free course is another approach to attracting potential students. Later on, you can upsell them by providing advanced modules and lessons to your students.
Another thing you can do when pricing your online course is to set up a free trial period. It’s handy if your online has a lot of lessons in it.
Step 6: Create Promotion for Your Online Course
A good practice to promote your online is to create a promotional offer. Well, that’s one of the reasons to love Payhip. You can create various promotions for your online course by clicking on the Marketing menu. We will highlight all several features you can use right away.
Coupons
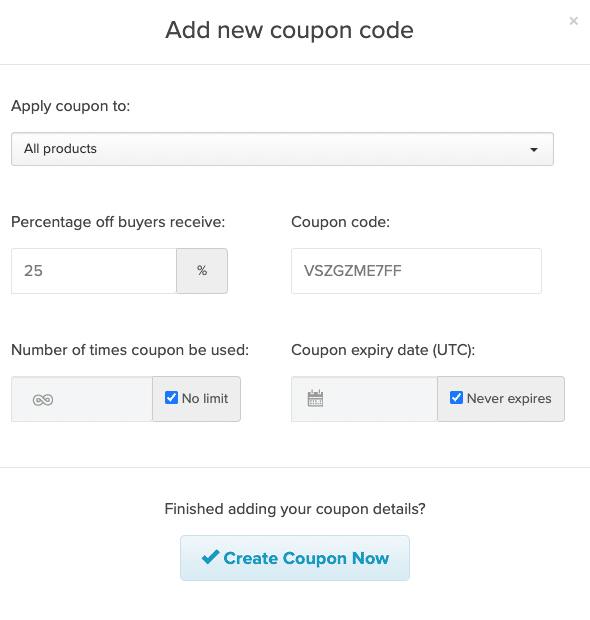
Let’s face it. Everyone loves coupons and deals, right? You can create a Coupon Code for your online course, so your students will be able to redeem the code and apply them to get discounts. Moreover, you can professionally customize your coupon by limiting the number of times someone could use it and also setting an expiry.
This feature is handy when you’re running an online course and want to create an early bird discount for the first few students to enroll. You can promote your coupon to your email subscribers and get them to enroll in your online course.
Affiliates
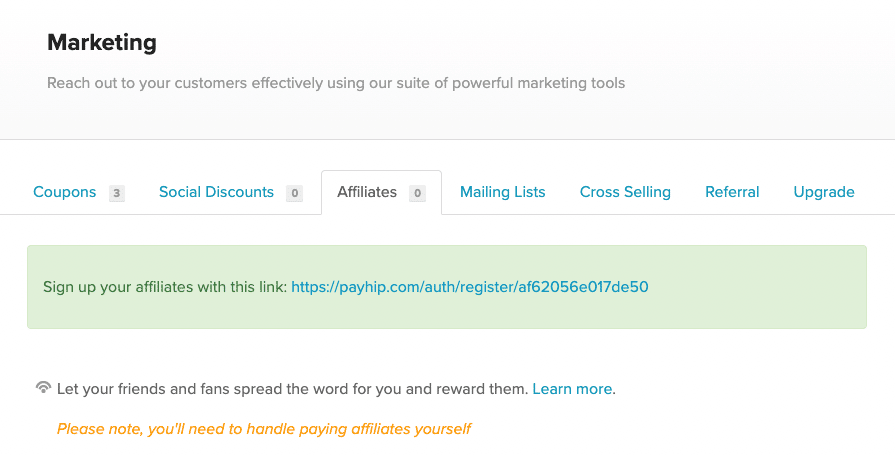
If you want to snowball your online course, one of the best ways to do that is to recruit your students to promote them as an affiliate. With this powerful feature, you can sign your students up to participate and earn commissions when they make a sale promoting your online course. However, you must handle your affiliate payment yourself since Payhip can’t do that for you.
Step 7: Optional Steps
When you complete all the five steps above, you are ready to publish and promote your online course and attract potential students to enroll. However, there are additional steps you can take to provide more benefits for your students.
Certificates
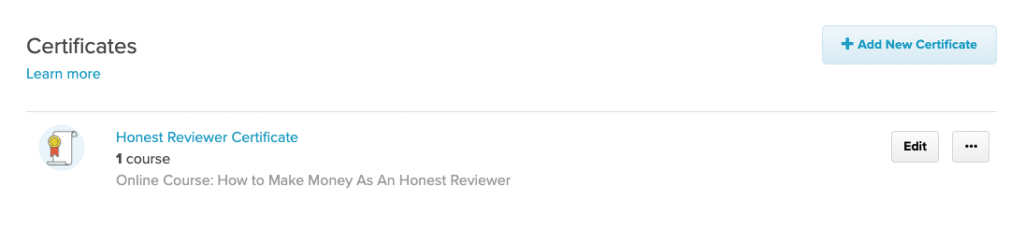
When your student completes your online course, handing them a certificate of completion is worth considering to provide more value. Payhip lets you do that with ease.
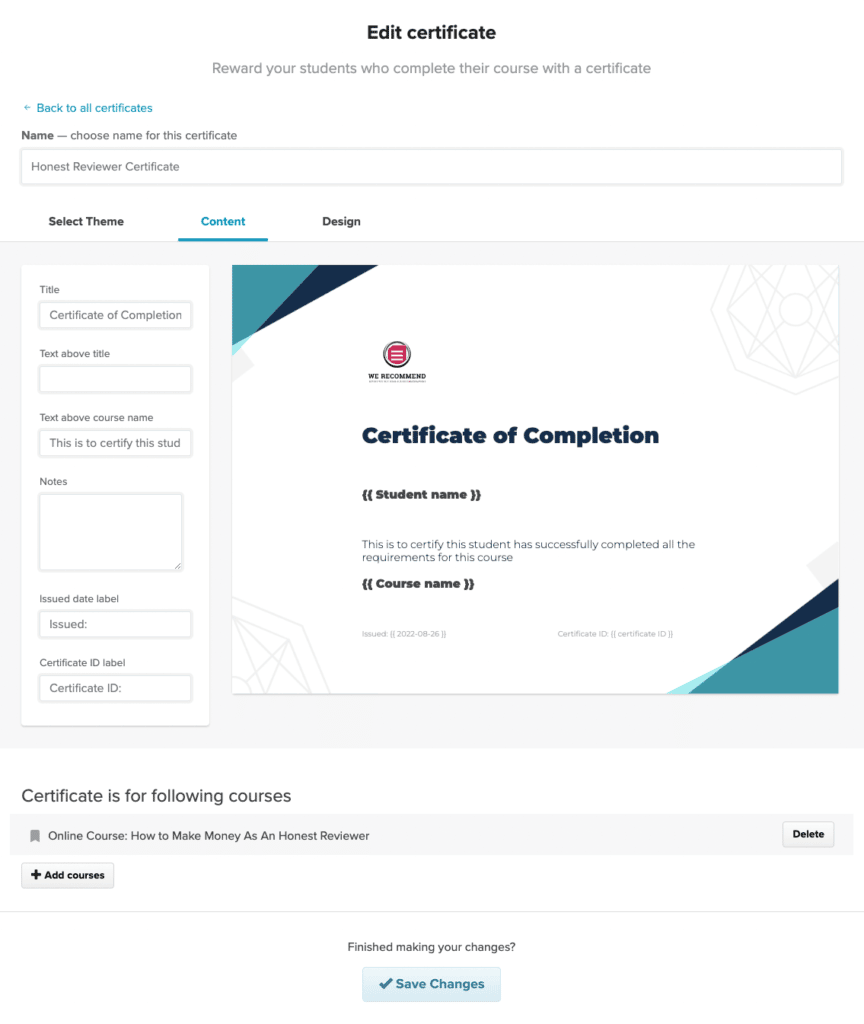
Head on to the Certificates menu and click on + Add New Certificate. Payhip provides various templates you can use, or you can also upload a template you have previously made. It’s that easy.
Drip Schedule
This feature is a powerful option if you’d like to release your online course lessons based on the day your students enroll.
Creating a Drip Schedule aims to get your students to learn one lesson at a time to help them progress according to your pace. This might be an advanced feature, but it’s easy to set this up.
Simply click on the Drip menu and hit the Create Drip Schedule Button. You will see a screenshot like this below.
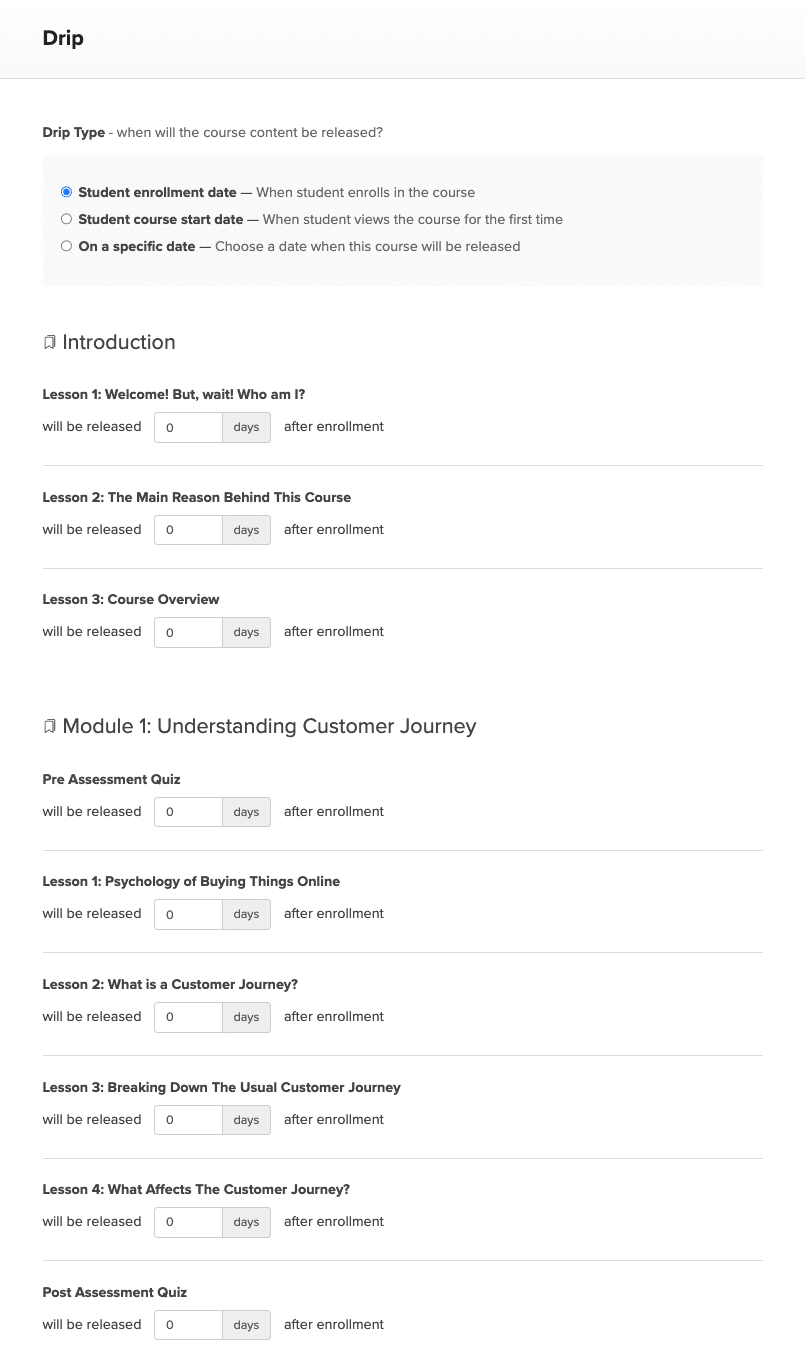
You can customize the Drip Type and set your online course lessons to be released based on the day your student enrolls in your course.
For example, you might want to Drip Schedule your online course based on modules or lessons. If you have 6 modules, you might want to release them daily. So, you can set day 1 for your students to enroll in your first module, day 2 for your second module, and so on.
Another thing you can do is release your course based on a specific date. This option is great when you already have several students to enroll. For example, if you want your students to enroll again in your next online course for free or at a discounted price, you can choose this option.
Conclusion
There you have it. We hope we can enlighten you on how to create an online course with Payhip. Although there are a handful of other platforms you can use, we strongly recommend trying Payhip due to its versatility and various features you can use for free. Simply follow all these steps above, and you’re ready to launch your online course with Payhip.